


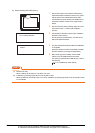
16. INSTALLATION OF COREOS, BOOTOS AND STANDARD MONITOR OS
16 - 1
9
UTILITY FUNCTION
10
COMMUNICATION
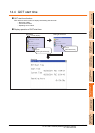
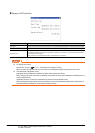
INTERFACE SETTING
(COMMUNICATION SETTING)
11
DISPLAY AND
OPERATION SETTINGS
(GOT SET UP)
12
CLOCK SETTINGS AND
BATTERY STATUS DISPLAY
(TIME SETTING AND DISPLAY)
13
FILE DISPLAY AND
COPY (PROGRAM/DATA
CONTROL)
14
GOT SELF CHECK
(DEBUG AND SELF
CHECK)
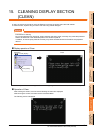
15
CLEANING DISPLAY
SECTION (CLEAN)
16
INSTALLATION OF
COREOS, BOOTOS AND
STANDARD MONITOR OS
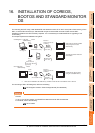
16. INSTALLATION OF COREOS,
BOOTOS AND STANDARD MONITOR
OS
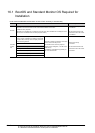
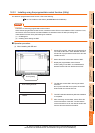
For executing the GOT utility, install the BootOS and standard monitor OS on the C drive (built-in flash memory) of the
GOT, or set the OS boot drive to [A: Standard SD card] and insert the SD card with OS files into the GOT.
(BootOS is installed in the GOT at factory shipment. It is not necessary to install BootOS when upgrading of it is
unnecessary.)
This chapter explains the installation using GOT.
*1 When execute installation with USB memory, standard monitor OS has to be installed in GOT in advance.
For the writing of OS in GT Designer3, refer to the following.
GT Designer3 Version1 Screen Design Manual (Fundamentals)
POINT
POINT
POINT
CoreOS
In 16.1 to 16.4 of this chapter, only BootOS and standard monitor OS are described.
For CoreOS, refer to the following.
16.5 CoreOS
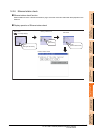
GOT SD card/ GOT
BootOS or
standard monitor OS
installation
BootOS or
standard monitor OS
installation
SD card/USB memory
GT Designer3
Write
OS file
OS file
upload
When GOT is remote, installed
easily using the CF card/
USB memory
Install OS from GOT to GOT
using CF card/USB memory.
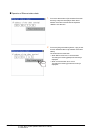
GT Designer3 SD card/ GOT
Install the SD
card in GOT
Install the SD
card in GOT
Install the SD
card/USB
memory in GOT
Write
OS file
Set the OS boot
drive to [A: Standard
SD Card].
SD card
The GOT can starts without an
OS installed.
SD card/USB memory
USB memory
USB memory
*1
*1