


Configuration and Use Manual 129
Ticket Formatting and Printing
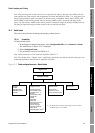
Configuring Custody Transfer StartupConfiguring TicketsConfiguring Digital Communications
Note: The Transfer Print Screen and Transfer Screens to Print options are similar to the Transfer
Reset Screen and Transfer Scr To Reset menu options described in Section 14.5, Step 6, except that
this menu includes the Inventory option, and if the discrete input is configured here, a ticket will be
printed when the discrete input is activated. The discrete input and transfer screens specified here are
reflected in the corresponding reset menu options, and vice versa.
Multiple tickets
If multiple tickets are required, set Number of Transfer Tickets to the required number. Because a
transfer (OIML) print request may complete the current transfer and begin a new one, you cannot use
multiple print requests to print duplicate tickets. All tickets for the same OIML transfer are identical;
they do not contain the “Duplicate receipt” banner.
15.7 Batch (OIML) tickets
This section describes the formatting and printing of transfer tickets when the custody transfer
application is configured for World Area = OIML and the discrete batch application is used to manage
the custody transfer transaction.
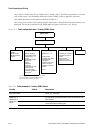
15.7.1 Formatting
To format batch (OIML) tickets:
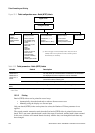
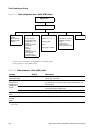
1. In the Digital Communication menu, select
Configure RS-485 and set Protocol to Printer.
The menu shown in Figure 15-4 is displayed.
2. Select
Format W&M Ticket.
3. Set parameters as desired. See Table 15-6.
Note: The Pre Header, Post Footer, Header Line 1, Header Line 2, and Footer parameters are shared
with all ticket types. Any formatting defined for transfer (OIML) or batch (OIML) tickets is applied to
all tickets.
Note: Other parameters in this menu are defined in Table 13-3.
Note: In previous versions of the custody transfer application, a Transfer Total Format parameter was
displayed. This has been replaced by the W&M Approval option in the Configuration > Monitoring
menu (see Section 14.5, Step 4).