


Agilent N5161A/62A/81A/82A/83A MXG Signal Generators User’s Guide 95
Preliminary Optimizing Performance
Preliminary Using Flatness Correction
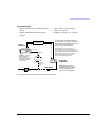
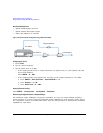
2. Connect the power meter to the RF output and enter the correction values:
The user flatness correction array title displays User Flatness: (UNSTORED), without a name,
indicating that the current user flatness correction array data has not been saved to the file
catalog.
Optional: Save the User Flatness Correction Data
1. Press Load/Store > Store to File.
2. Enter a file name (for this example, FLATCAL1) and press Enter.
The user flatness correction array file is now stored in the file catalog as a USERFLAT file. Any
user flatness correction files saved to the catalog can be recalled, loaded into the correction array,
and applied to the RF output to satisfy specific RF output flatness requirements.
3. Press Return.
Enable the Flatness Correction at the RF Output
• Press Return > Flatness Off On.
The UF annunciator appears in the AMPLITUDE area of the display, and the correction data in the
array is applied to the RF output.
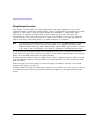
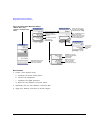
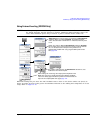
With a Power Meter Over LAN, GPIB, or USB Manually
i. Create the correction values:
Press More > User Flatness > Do Cal.
The signal generator begins the user
flatness calibration, and displays a progress bar.
The amplitude correction values load
automatically into the
user flatness correction array.
ii. View the stored amplitude correction values:
Press Configure Cal Array.
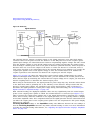
i. Open the User Flatness table editor and highlight
the frequency value in row 1:
Press More > User Flatness > Configure Cal Array.
The RF output changes to the frequency value of
the table row containing the cursor.
ii. Note the value measured by the power meter.
iii. Change the sign on the delta value (e.g. the delta
value of the 0 dBm reference value (step f), and the
measured value from ii is –.34, change the value to
+.34).
iv. Highlight the correction value in row 1.
v. Press
Select > enter the delta calculated in step iii > dB.
(e.g. For this example enter +.34)
The signal generator adjusts the output amplitude
based on the correction value entered.
vi. Repeat steps ii − v until the power meter reads 0 dBm.
vii. Highlight the frequency value in the next row.
viii.Repeat steps ii through vii for the remaining rows.