


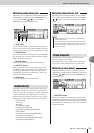


Recording on the stereo track
9
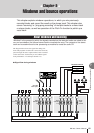
Mixdown and bounce operations
87
AW1600 Owner’s Manual
Here’s how to record the final mix on the stereo track.
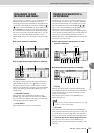
1
In the Quick Navigate section, repeatedly
press the [RECORD] key or hold down the
[RECORD] key and use the CURSOR [ ]/
[] keys to access the MIXDOWN page of
the RECORD screen.
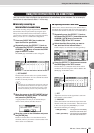
2
Move the cursor to the REC button of the
MIXDOWN page, and press the [ENTER] key
to turn the button on.
The panel [STEREO] key will blink red. This blinking
indicates that the stereo track is in record-ready mode.
3
Press the RTZ [ ] key to rewind the song.
Then hold down the REC [●] key and press
the PLAY [ ] key.
The song will begin playing, and the playback will be
recorded on the stereo track.
4
When you reach the end of the song, move
the cursor to the SAFE button in the screen
and press the [ENTER] key.
A popup window will ask you to confirm that you
want to cancel record-ready mode. Move the cursor to
the OK button and press the [ENTER] key.
5
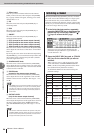
To play back the stereo track, repeatedly
press the Quick Navigate section [MONI-
TOR] key or hold down the [MONITOR] key
and use the CURSOR [ ]/[ ] keys to
access the ST.TRACK page of the MONI-
TOR screen.
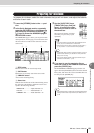
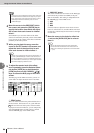
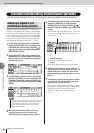
1 ST.TRACK ON/OFF button
Switches stereo track playback on/off.
B Virtual track
Selects the virtual track that is assigned to the stereo
track. The currently selected virtual track is indicated
by a “●.” Of the other virtual tracks, those that have
already been recorded are indicated by “ ,” and the
unrecorded tracks are indicated by “–”.
C Track view
In this area, markers and the presence or absence of
track data are displayed graphically.
D PRE/POST buttons
These buttons select whether the level meter in the
ST.TRACK page will indicate the pre-fader level
(PRE) or the post-fader level (POST). This setting is
shared with the BUS page of the VIEW screen.
E Level meter
This indicates the output level of the stereo track.
6
Switch the ST.TRACK ON/OFF button ON.
When this button is on, the stereo track output will be
sent to a point directly before the [STEREO] fader,
and can be monitored from the STEREO/AUX OUT
jacks or the MONITOR OUT jacks. At this time, the
record-ready status of all tracks will be cancelled.
7
Press the RTZ [ ] key to rewind the song,
and press the PLAY [ ] key.
The stereo track will be played back. Use the [STE-
REO] fader to adjust the monitor level.
When playback ends and you want to move to a differ-
ent screen, switch the ST.TRACK ON/OFF button
OFF.
8
Save the song.
If the song is not saved after it has been recorded as a
stereo track, it cannot be selected for burning to a CD.
Recording on the stereo track
• The data that is recorded here on the stereo track will be the
data that is used to create an audio CD. If you want to pre-
cisely specify the beginning or end of the song, it is conve-
nient to use Auto Punch-in/out (
→
p. 59).
HINT
54
1
32
•Even while the stereo track is playing, you can still monitor the
signals from the input channels.
HINT
• EQ and dynamics processing are applied to the playback of
the stereo track.
NOTE
• If desired, you can use the [UNDO/REDO] button to cancel
the recording that was made on the stereo track (
→
p. 61), or
use the ST.TRACK page to switch virtual tracks and record
another take (
→
p. 62).
HINT