


© 2003 Shure Incorporated DFR22 Software Guide 15
Manage Your Presets
are listed in a column under each connection block. Click the checkbox next to each input or output channel you
wish to map to the control connections. For more information, refer to the “Processor Mapping” section on page 95.
9. Lock Processors for Read-Only Access
This step is applicable only when you are customizing security for end users accessing the DFR22 from the soft-
ware. This type of security is stored with each processor, at the preset level. Select the processors that the user
should not be able to modify, and select [Security>Level 2>Lock Selected] from the main menu. For a complete
explanation and further instructions, refer to the Individual Processor Security section on page 101.
10. Name the Preset
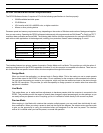
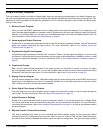
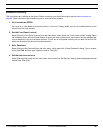
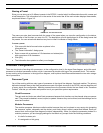
Click once with the left mouse button anywhere in the information box in
the center of the control bar to open the “Preset Information” dialog, as
pictured on the right in Figure 2-3. Enter a name for the preset, up to 15
characters long, and a description, then click [OK]. For more information,
refer to the Naming a Preset section on page 20.
Manage Your Presets
1. Store the Finished Preset in the Device
If you are working in Live Mode, the preset is already stored in the
device. If you are working in Design Mode, click the [Store Preset] button on the control bar of the main window.
For more information, refer to the Device Presets section on page 29. To duplicate this preset you need to be in
Design Mode. Simply continue to click the [Store Preset] button, creating duplicates until you have stored as many
presets in the device as you require.
2. Delete Unused Presets from the Device
The device comes pre-loaded with three presets. If you are not going to use them, you should delete them from the
device so end users cannot access them. (If you need them again later, you can recall them from the [File>New]
menu.) See the Delete a Preset section on page 30 for instructions.
3. Enable External Control
Once you are finished creating and editing presets, if you previously disabled control connections in order to con-
trol the Audio Processor via the computer, open the Control Pins window and re-enable them. See the IMPOR-
TANT NOTE ON PRESET SWITCHING: section on page 88 for more information.
FIGURE 2-3 “Preset Information” Dialog