


56 Micro Motion
®
Model 1500 Transmitters with the Filling and Dosing Application
Configuring the Filling and Dosing Application
7.3.1 Purge
Note: Two-stage discrete filling is not supported if a purge cycle is configured. If this functionality is
required, configure the mA output as a three-level output, to control the fill, and configure Channel C
as a discrete output, to control the purge.
If purge will be performed, one of the following valve control configurations is required:
• Two discrete outputs (one may be the mA output configured as a discrete output). One must be
assigned to the primary valve and the other must be assigned to the secondary valve. The
primary valve is used to control the fill, and the secondary valve controls the purge.
• The mA output configured as a three-level output, and Channel C configured as a discrete
output assigned to the secondary valve.
The second discrete output is typically set up to control compressed air or a vacuum. These
techniques are used to clear any process fluid that may be left in the piping from the previous fill.
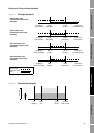
There are two purge modes: manual and automatic.
• If
Manual is configured, the Begin Purge and End Purge buttons on the Run Filler window
are used to control the purge. The
End Fill button also stops a purge.
• If
Auto is configured, the purge starts automatically after the configured Purge Delay, and
continues for the configured
Purge Time. The purge may be stopped manually using the End
Fill
button.
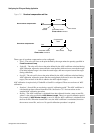
In both cases, the discrete output assigned to the secondary valve transmits an Open signal when the
purge begins, and transmits a Closed signal when the purge ends. The primary valve remains closed
throughout the purge.
The purge can be stopped at any point, by using the
End Purge or End Fill button.
7.3.2 Cleaning
Cleaning does not require any special valve configuration. When cleaning is started, all valves
assigned to the system (except any valves configured for purging, as discussed in the previous section)
are opened; when cleaning is stopped, all valves assigned to the system are closed.
Typically, cleaning involves flowing water or air through the system.
7.4 Configuring the filling and dosing application
To configure the filling and dosing application:
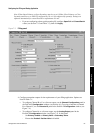
1. Open the ProLink II
Configuration window.
2. Click the
Filling tab. The panel shown in Figure 7-3 is displayed. In this panel:
a. Configure the flow source (see Section 7.4.1) and click
Apply.
b. Configure
Fill Type and other filling control options (see Section 7.4.2) and click Apply.
Note: You must configure Fill Type before configuring valve control.
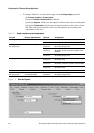
3. Configure valve control as required:
• If you are configuring a one-stage discrete fill, skip this step and continue with Step 6.
• If you are configuring a two-stage discrete fill, configure
Open Primary, Open
Secondary
, Close Primary, and Close Secondary (see Section 7.4.3 and Table 7-4),
then click
Apply.