


Configuration and Use Manual 13
Flowmeter Startup
Using ProLink II Required ConfigurationFlowmeter StartupBefore You Begin
Additionally, if you have the enhanced core processor and you are using ProLink II to zero the
flowmeter, you can also restore the prior zero immediately after zeroing (e.g., an “undo” function), as
long as you have not closed the Calibration window or disconnected from the transmitter. Once you
have closed the Calibration window or disconnected from the transmitter, you can no longer restore
the prior zero.
3.5.1 Preparing for zero
To prepare for the zero procedure:
1. Apply power to the flowmeter. Allow the flowmeter to warm up for approximately 20 minutes.
2. Run the process fluid through the sensor until the sensor temperature reaches the normal
process operating temperature.
3. Close the shutoff valve downstream from the sensor.
4. Ensure that the sensor is completely filled with fluid.
5. Ensure that the process flow has completely stopped.
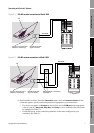
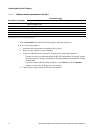
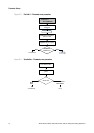
3.5.2 Zero procedure
To zero the transmitter:
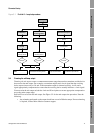
• With ProLink II, see Figure 3-3.
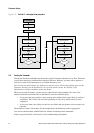
• With the zero button, see Figure 3-4. Note the following:
- You cannot change the zero time with the zero button. If you need to change the zero time,
you must use ProLink II.
- The zero button is located on the front panel of the transmitter. To press the zero button,
use a fine-pointed object that will fit into the opening (0.14 in [3.5 mm]). Hold the button
down until the status LED on the front panel begins to flash yellow.
CAUTION
If fluid is flowing through the sensor, the sensor zero calibration may be
inaccurate, resulting in inaccurate process measurement.
To improve the sensor zero calibration and measurement accuracy, ensure that
process flow through the sensor has completely stopped.