


Before you begin
4 — Operation Guide
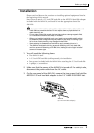
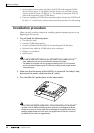
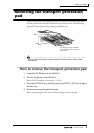
4. Place the hard disk on the ADP25H as shown in the diagram below,
align the screw holes of the hard disk and the ADP25H, and use your
screwdriver to fasten the screws at the four locations shown.
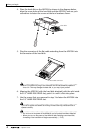
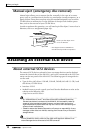
5. Plug the connector of the flat cable extending from the ADP25H into
the connector of the hard disk.
• Even if it is difficult to plug in the connector, do not use excessive pressure to
force it in. This may damage the hard disk, or you may injure yourself.
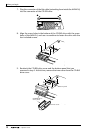
6. Aligning the ADP25H (with the hard disk attached) with the rails inside
the 2.5" HARD DISK DRIVE slot, push it in until it clicks into place.
7. Use the screws that you removed in step 3 to fasten the ADP25H into
the 2.5" HARD DISK DRIVE slot.
If you fail to tighten the screws all the way, the hard disk may vibrate and fail to
operate correctly.
• Do not turn on the power of the AW4416 until all options have been installed.
• When you turn on the power of the AW4416 after installing a new hard disk,
formatting of the hard disk will begin automatically (
→
P.15).
Flat cable
Flat cable connector