


24-9
Catalyst 2950 Desktop Switch Software Configuration Guide
78-14982-01
Chapter 24 Configuring SNMP
Configuring SNMP
Beginning in privileged EXEC mode, follow these steps to configure SNMP on the switch:
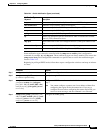
Command Purpose
Step 1
configure terminal Enter global configuration mode.
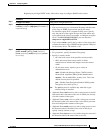
Step 2
snmp-server engineID {local engineid-string
| remote ip-address [udp-port port-number]
engineid-string}
Configure a name for either the local or remote copy of SNMP.
• The engineid-string is a 24-character ID string with the name
of the copy of SNMP. You need not specify the entire
24-character engine ID if it contains trailing zeros. Specify
only the portion of the engine ID up to the point where only
zeros remain in the value. For example, to configure an engine
ID of 123400000000000000000000, you can enter this:
snmp-server engineID local 1234
• If you select remote, specify the ip-address of the device that
contains the remote copy of SNMP and the optional UDP port
on the remote device. The default is 162.
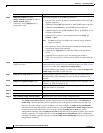
Step 3
snmp-server group groupname {v1 | v2c | v3
[auth | noauth | priv]}] [read readview]
[write writeview] [notify notifyview] [access
access-list]
Configure a new SNMP group on the remote device.
• For groupname, specify the name of the group.
• Specify a security model:
–
v1 is the least secure of the possible security models.
–
v2c is the second least secure model. It allows
transmission of informs and integers twice the normal
width.
–
v3, the most secure, requires you to select an
authentication level:
auth—Enables the Message Digest 5 (MD5) and the
Secure Hash Algorithm (SHA) packet authentication.
noauth —The noAuthNoPriv security level. This is the
default if no keyword is specified.
priv—Enables Data Encryption Standard (DES) packet
encryption (also called privacy).
Note The priv keyword is available only when the crypto
software image is installed.
• (Optional) Enter read readview with a string (not to exceed 64
characters) that is the name of the view in which you can only
view the contents of the agent.
• (Optional) Enter write writeview with a string (not to exceed
64 characters) that is the name of the view in which you enter
data and configure the contents of the agent.
• (Optional) Enter notify notifyview with a string (not to exceed
64 characters) that is the name of the view in which you
specify a notify, inform, or trap.
• (Optional) Enter access access-list with a string (not to exceed
64 characters) that is the name of the access list.