


7-39
Catalyst 2950 Desktop Switch Software Configuration Guide
78-14982-01
Chapter 7 Administering the Switch
Managing the System Time and Date
You need to configure only one end of an association; the other device can automatically establish the
association. If you are using the default NTP version (version 3) and NTP synchronization does not
occur, try using NTP version 2. Many NTP servers on the Internet run version 2.
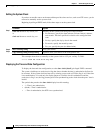
To remove a peer or server association, use the no ntp peer ip-address or the no ntp server ip-address
global configuration command.
This example shows how to configure the switch to synchronize its system clock with the clock of the
peer at IP address 172.16.22.44 using NTP version 2:
Switch(config)# ntp server 172.16.22.44 version 2
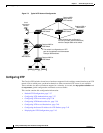
Configuring NTP Broadcast Service
The communications between devices running NTP (known as associations) are usually statically
configured; each device is given the IP addresses of all devices with which it should form associations.
Accurate timekeeping is possible by exchanging NTP messages between each pair of devices with an
association. However, in a LAN environment, NTP can be configured to use IP broadcast messages
instead. This alternative reduces configuration complexity because each device can simply be
configured to send or receive broadcast messages. However, the information flow is one-way only.
The switch can send or receive NTP broadcast packets on an interface-by-interface basis if there is an NTP
broadcast server, such as a router, broadcasting time information on the network. The switch can send NTP
broadcast packets to a peer so that the peer can synchronize to it. The switch can also receive NTP broadcast
packets to synchronize its own clock. This section provides procedures for both sending and receiving NTP
broadcast packets.
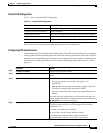
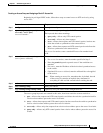
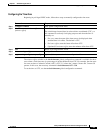
Beginning in privileged EXEC mode, follow these steps to configure the switch to send NTP broadcast
packets to peers so that they can synchronize their clock to the switch:
Step 3
end Return to privileged EXEC mode.
Step 4
show running-config Verify your entries.
Step 5
copy running-config startup-config (Optional) Save your entries in the configuration file.
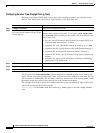
Command Purpose
Command Purpose
Step 1
configure terminal Enter global configuration mode.
Step 2
interface interface-id Specify the interface to send NTP broadcast packets, and enter
interface configuration mode.
Step 3
ntp broadcast [version number] [key keyid]
[destination-address]
Enable the interface to send NTP broadcast packets to a peer.
By default, this feature is disabled on all interfaces.
• (Optional) For number, specify the NTP version number. The
range is 1 to 3. If you do not specify a version, version 3 is used.
• (Optional) For keyid, specify the authentication key to use when
sending packets to the peer.
• (Optional) For destination-address, specify the IP address of the
peer that is synchronizing its clock to this switch.
Step 4
end Return to privileged EXEC mode.
Step 5
show running-config Verify your entries.