94 C1624M-F (9/07)
CONFIGURATION
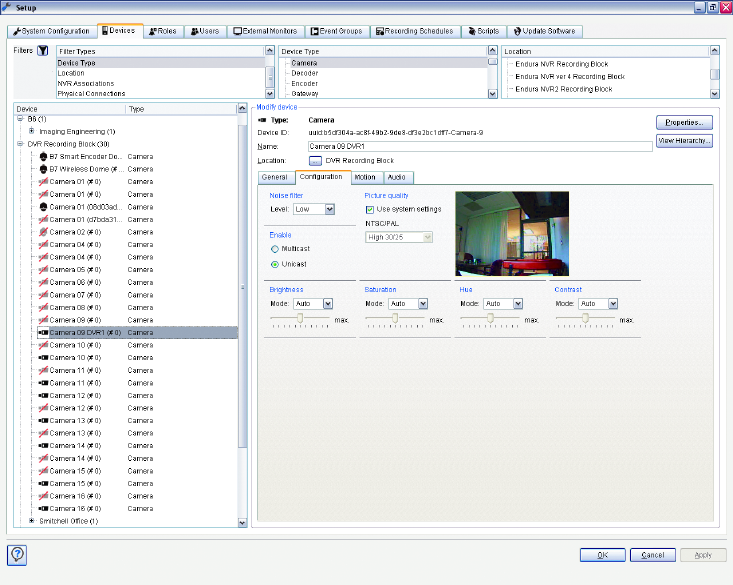
Figure 111. Camera Setup: Configuration Tab
To configure a camera:
1. Click the Configuration tab.
2. Select a noise filter level: low, medium, or high. This filter removes high frequency noise from the camera to improve the quality of the
encoded video signal.
3. Select multicast or unicast by clicking the radio button. The default setting is multicast.
In multicasting, a single device sends information across the network and any listening devices on a network receive that stream. A special
IP address range has been reserved for this purpose: 224.0.0.1-239.255.255.255 with a subnet mask of 255.255.0.0. Each multicast
transmitting device sends a data stream to an address in the above range. Any device on the network can listen for transmissions to that
IP address and receive the stream. The advantage of multicasting is that it reduces bandwidth consumption while still allowing multiple
users to view the same video stream.
Multicast also offers control over which devices on a network can receive a multicast stream. In an Endura system, only Endura devices can
receive Endura multicast streams. Multicast traffic is not routable across the Internet; a dedicated, nonpublic path is required.
4. Select the picture quality. A higher picture quality consumes more network bandwidth and hard disk storage space, but it preserves a better
representation of the recorded scene. Refer to Picture Quality on page 82 for more information.
• Click the Use System Settings check box to use the picture quality selected on the System Configuration tab.
OR
• Select a setting from the list. Four settings are available for Low, Medium, or High. The numbers next to the setting indicate the number
of ips that will be recorded. The first number is for NTSC cameras; the second is for PAL cameras.
Note that if you change the picture quality setting, the affected camera will stop recording for up to five seconds. This pause will show up
as a gap in your search results for that camera.


