


4-22
Preset Programming
Studio Color LCD Controller
Recording a Loop as a Preset
Start the loop running, then assign the entire loop to one of
the Preset keys. For more information about loops, see the
section titled “Creating a Loop” on page 4-14.
1. Use the Page
<Up>
and
<Down>
arrow keys to select any page
within the loop that you want to record as a preset.
2. Toggle the
<Address>/<Preset>
key until the Address LED is
ON.
3. Press the
<Auto>
key. The pages start advancing, playing
back the loop at the rate set by the
<Rate>
knob and the Delay
construct.
4. Toggle the
<Address>/<Preset>
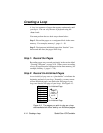
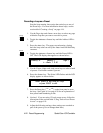
key until the Preset LED is
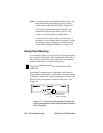
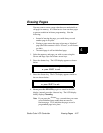
ON. The LCD display then appears as shown below:
5. Use the Cursor
<Right>
and
<Left>
arrow keys to select a bank
of presets. Each bank contains 8 presets.
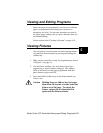
6. Press the
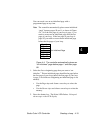
<Select>
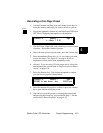
key. The Select LED flashes and the LCD
display appears as shown below:
7. Press the Preset key (
<1>
to
<8>
) on the front panel to store
the loop. See Figure 4-5 on page 4-20 for an explanation of
how preset bank numbering works.
8. Optional. If you are using 12-level preset access, follow the
instructions in the section titled “Using Twelve-Level Preset
Access” on page 6-19.
9. Adjust the following settings; these settings are recorded as
part of the preset (you can change them later).
PRESET
ADDRESS
PRESET
ADDRESS
7#88 #+ -*#+
&,?#++@"
;) * 3- <
;0:'