


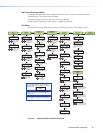
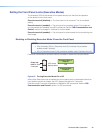

Advanced Configuration
Within this menu: a test pattern can be selected to aid setting up the display, connected
touch panel displays can be calibrated, auto imaging, aspect ratio, and auto memory can
be set or turned on or off, the image capture and recall location can be set, the overscan
threshold set, and the switch effect chosen. In addition, the internal temperature can be
read, and the unit can be reset to factory default settings.
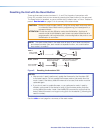
1. Within Advanced Configuration, press Next to enter the first sublevel, Test Pattern.
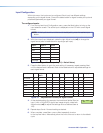
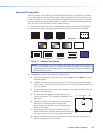
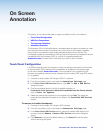
The following test pattern settings are available (None [no test pattern] is the default):
White Field
Crosshatch 4x4
Alternating
Pixels
Color Bars
Grayscale
Crosshatch
1.78 Aspect
1.85 Aspect 2.35 Aspect
1.33 Aspect
Crop
Ramp
Alternating
Lines
White Field
Blue Mode
Figure 12. Available Test Patterns
NOTE: The test patterns may vary based on the output rate selected. For example, if
a 4:3 rate is selected, then the 4:3 crosshatch (32x24) and aspect ratio crop patterns
appear. The raster border is independent of the aspect ratio, always surrounding the
active area of the screen.
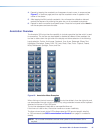
2. Press Next to cycle to the Calibrate Panels submenu.
a. Within the Advanced Configuration menu, select Yes and press Next to cycle to
Calibrate Panels.
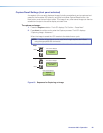
b. Observe all connected touchpanel screens. On all screens a green box appears
at top center. To start the sequence, tap the box on one of the panel screens you
need to calibrate.
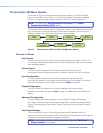
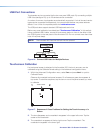
c. The box disappears and a crosshatch + appears in the upper left corner. Tap the
screen at the crosshatch.
d. The crosshatch re-appears at the top right corner.
Tap the crosshatch. The crosshatch re-appears in the
lower right.
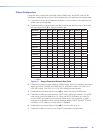
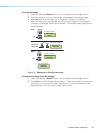
e. Repeat by tapping the crosshatch as it reappears in
each corner, in sequence (see image at right)
and then tap the crosshatch when it appears in the
center of the screen.
f. After tapping the fifth (central) crosshatch, the unit
saves the calibration data and restarts the sequence by
showing the green box on all connected touchpanels.
g. Repeat for each connected touchpanel screen. Press any front panel button to
exit the sequence and save the data.
1
4
3
2
5
Touch to Start
Annotator 300 • Operation 20