


Operation
This section of the manual discusses the operation of an Annotator 300 unit and is divided
into four sections:
• Front Panel Overview
• The Annotator 300 Menu System
• Setting the Front Panel Locks (Executive Modes)
Front Panel Overview
USB
CAPTURE
RECALL
MENU
NEXT
INPUTS
123
AUTO
IMAGE
ADJUST
CONFIG
ANNOTATOR 300
ANNOTATION GRAPHICS PROCESSOR
A
D
EFG
H
B
C
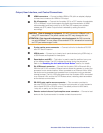
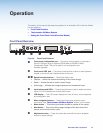
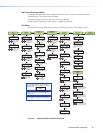
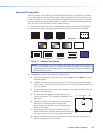
Figure 6. Front Panel Features
A
Front panel configuration port — Connect a control system or computer to
this mini USB port using an optional USB A Male to USB Mini B Male
Configuration Cable. This port is used for unit configuration and
firmware upgrades.
B
Front panel USB port — Connect an external drive to store or recall captured
images, or connect a user interface device to this port.
CE
Special function buttons — These three buttons are:
• Capture — Allows the capture and saving of the current image,.
• Recall — Allows the user to recall a saved image.
• Auto Image — Initiates auto image adjustment on the selected input.
D
Input buttons and LEDs — These three buttons are used to select and switch
inputs. A lit LED indicates the currently active input.
F
LCD display — This LCD screen displays two rows of menu, control response,
and configuration text.
G
Menu navigation buttons — These two buttons give access to menu
commands. See “The Annotator 300 Menu System” section in this chapter.
• Menu button — This button gives direct access to a series of five menus.
• Next button — This button allows page changes within each one of the
menus, and to exit the menu cycle.
H
Adjustment knobs — These two knobs are used with the menu navigation
buttons to adjust settings.
Annotator 300 • Operation 14