


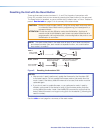
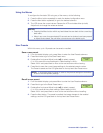
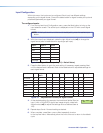

Resetting the Unit with the Reset Button
There are three reset modes (numbered 1, 4, and 5 for the sake of comparison with
Extron IPL products) that you can access by pressing the Reset button on the rear panel.
The Reset button is recessed, so use a pointed stylus, ballpoint pen, or Extron Tweeker to
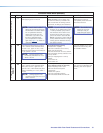
press it. See the table on page 13 for a summary of the reset modes.
CAUTION: Review the reset modes carefully. Using the wrong reset mode may result
in unintended loss of flash memory programming, port reassignment, or
processor reboot.
ATTENTION: Étudier de près les différents modes de réinitialisation. Appliquer le
mauvais mode de réinitialisation peut causer une perte inattendue de la
programmation de la mémoire flash, une reconfiguration des ports ou une
réinitialisation du contrôleur.
NOTE: The reset modes listed in the table close all open IP and Telnet connections
and close all sockets. Also, each mode is a separate function, not a continuation
from mode 1 to mode 5.
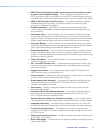
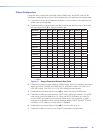
RESET
RESET
RESET
RESET
Release, then immediately
press and release again. Reset
LED flashes in confirmation.
Modes 4, and 5
Press and hold
the Reset button.
Mode 1
Reset LED flashes once,
twice, or three times.
Press and hold for
6 or 9 seconds.
Apply Power
1
2
RESET
Release Reset button.
Figure 5. Resetting the Annotator 300
NOTES:
• After a mode 1 reset is performed, update the firmware for the Annotator 300
to the latest version. Do not operate the firmware version that results from the
mode 1 reset. If the factory default firmware is to be used, that version must be
uploaded again.
• If you do not want to update firmware, or you performed a mode 1 reset by
mistake, cycle power to the device to return to the firmware version that was
running before the mode 1 reset. Use the 0Q SIS command to confirm that the
factory default firmware is no longer running (look for the asterisk [*] following the
version number).
See the table on next page for a summary of the reset modes.
12Annotator 300 • Rear Panel Features and Connections