


Chapter 16 Replacing the hard disk 191
Installation and Maintenance Guide
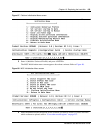
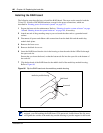
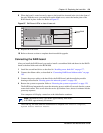
8 When the board is seated correctly, return to the board face inserted in the slot in the front of
the unit. With the screw you removed from the blank cover, secure the header plate of the
RAID board in place in the slot. Refer to Figure 97.
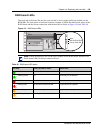
Figure 97 RAID board LEDs on face of base unit
9 Replace the front bezel.
10 Refer to the next section to complete the mirrored disk upgrade.
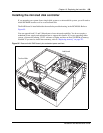
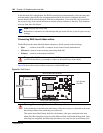
Connecting the RAID board
After you install the RAID board, you need to install a second hard disk and then wire the RAID
board to the hard disks and to the BCM1000.
1 Install the second hard drive as described in “Installing a new hard disk” on page 177.
2 Connect the ribbon cables, as described in “Connecting RAID board ribbon cables” on page
192.
3 Connect the power cables to the hard disks, the RAID board, and the media bay module
housing as described in “Routing power for mirrored systems” on page 193.
4 Restore the system to operation. Refer to “Restoring the system to operation” on page 170.
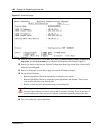
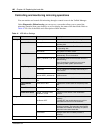
The RAID board automatically starts the mirroring process within 45 seconds after the system
comes back online. This occurs after the service up window closes, about six minutes into the
power-up sequence.
Your computer will display a status bar as the initialization continues.
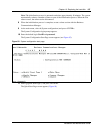
The event log will state when the initialization is complete:
HDD Rebuild Complete,
System Status Monitor Result
.
Note: Initialization times: 20G HDD: approximately three hours
8.4G HDD: approximately 80 minutes
Front of RAID
board