


Assembly Replacement ESG Family Signal Generators
A14BT1 Battery
5-24 Service Guide
A14BT1 Battery
Tools Required
• T-10 TORX screwdriver
• soldering tools
• utility knife
• Dow Corning 3145 RTV Clear Adhesive Sealant (part number 0470-0450)
Removal
1. Remove the instrument cover. (Refer to the “Instrument Cover” replacement procedure
on page 5-64.)
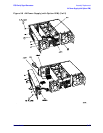
2. Remove the top cover by removing the 11 screws that secure it.
3. Remove the bottom cover by removing the 15 screws that secure it.
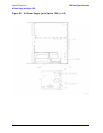
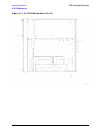
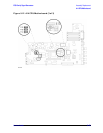
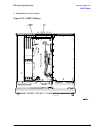
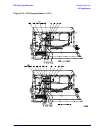
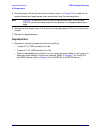
4. Unsolder the leads of the battery (A14BT1) from the CPU/motherboard (A14).
(See Figure 5-13.)
CAUTION Calibration data will be preserved with the removal of the battery. However,
user data will be lost unless it is saved and later restored using an external
controller.
5. The battery is also attached to the CPU/motherboard with a silicon adhesive. Using a
utility knife, carefully cut through the adhesive to lift and remove the battery from the
CPU/motherboard.
WARNING Battery A14BT1 contains lithium. Do not incinerate or puncture this
battery. Dispose of the discharged battery in a safe manner. Refer to
Chapter 7, “Safety and Regulatory,” for instructions on how to
dispose of the battery.
6. Remove any excess adhesive from the CPU/motherboard surface.
Replacement
WARNING Danger of explosion if battery if incorrectly replaced. Replace only
with the same or equivalent type recommended. Discard used
batteries according to manufacturer’s instructions.
1. Apply a small amount of silicon adhesive to the battery’s location on the
CPU/motherboard.
2. Insert the new battery into the CPU/motherboard making sure it is oriented with the
correct polarity.
3. Solder the battery’s leads to the CPU/motherboard.