


Operation
90 Runco SC-30d/SC-35d Installation/Operation Manual
PRE
L
IMINAR
Y
•Display 3D Settings: The Display 3D Settings menu is not applicable to the
SC-30d/SC-35d.
• Internal 3D Settings: Select Internal 3D Settings from the Display Device - Configure
menu to adjust the following timing settings for the Dimension Digital Controller’s
3D Sync output (see Figure 2-5 and Figure 3-25), to optimize performance of the
glasses, emitter and projector, for realistic simulation and 3D images.
• Sync Delay: This control adjusts the output 3D emitter delay to match the active
glasses to the left/right frames of the projector. Proper adjustment of this delay will
eliminate crosstalk and odd colors caused by timing differences between the
glasses and the projected image.
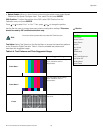
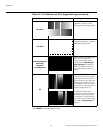
• Test Pattern Enable: To display the 3D test pattern (refer to Test Video on
page 85) while adjusting these settings, check the Test Pattern Enable box.
• 24Hz 3D Mode: This control selects how 24Hz 3D content will be processed in an
active 3D system. Lower frame rates can lead to excessive flickering, creating a need
for frame rate conversion (FRC) to 60Hz in each eye (120Hz total). The FRC modes are
as follows:
• 120Hz 6:4 (default) – Perform FRC using a 3:2 cadence for each eye (3 frames
of A followed by 2 frames of B), resulting in 60Hz per eye, or 120Hz total.
• 120Hz 5:5 – Perform FRC using a 3:2 cadence for the left eye (3 frames of A
followed by 2 frames of B) and a 2:3 cadence for the right eye (2 frames of A
followed by 3 frames of B), resulting in 60Hz per eye, or 120Hz total. This mode
is intended to help reduce judder created in the FRC process.
Network: The options in the Network menu allow you to configure the network
communication features.
• IP Configuration: Select IP Configuration from the Network menu to either set the IP
address, subnet mask and default gateway of the Dimension Digital Controller manually
or obtain these settings automatically, from a DHCP (Dynamic Host Configuration
Protocol) server. (Most broadband routers and gateways support DHCP.) You can also
test the network connection from this menu.
• DHCP: To enable the DHCP client in the Dimension Digital Controller, select DHCP
from the IP Configuration menu and set it to On. With this setting, the Dimension
Digital Controller’s IP address, subnet mask and default gateway are assigned by
the local DHCP server.
To manually configure these values, set DHCP to Off.
• IP Address: Select IP Address from the IP Configuration menu to manually
configure the IP Address of the Dimension Digital Controller, as follows:
1. Press or to select the first, second, third or fourth byte of the address.
2. Press or to set the value of that byte. The range is from 0 to 255 inclusive.
3. Repeat Steps 1 and 2 for all four bytes of the address.
4. Press MENU when you have finished setting the address.
• Subnet Mask: Select Subnet Mask from the IP Configuration menu to manually
configure the IP subnet mask. The procedure is similar to that for setting the IP
address.
The IP Address, Subnet Mask and Default Gateway items in the IP
Configuration menu are disabled (grayed out) when DHCP is
enabled.
Note