


97
Chaper 4 Operation Tips
Chapter 4 Operation Tips
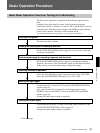
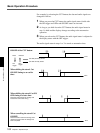
5 Press the STORE button on the unit.
A cue point with the specified cue number (02 in this example) is
stored and automatically linked with the new snapshot data.
To store the cue point on the CUE window
1 Open the CUE window.
2 Touch the NEW button.
At this time, if there are no cue points registered on the cue list, so
CUE 2 is created.
3 Select the TC LINK button by touching the TC LINK button
corresponding to CUE 2.
4 Touch the NUMBER button of the EVENT linked with CUE 2.
The event name list (name of the snapshot) opens.
5 Select the desired event name (name of the snapshot).
The specified event (snapshot) is linked with CUE 2.
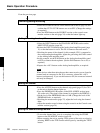
Note
If you change the time of the initial cue and the snapshot data linked with
the initial cue, the data existing between the time before the change and
after the change are lost and this may have an adverse effect on the result
after recalling automation. Take special care when updating the initial cue.
Changing a timecode of a cue point
1 Open the CUE window.
2 Touch the TIMECODE display corresponding to the cue point that you
want to change.
3 Enter a new timecode using the ten key pad.
Or increase or decrease a value using the + / - buttons and the jog dial.
4 Press the ENTER key.
Changing the snapshot data linked with the cue point
1 Open the CUE window.
2 Touch the NUMBER display of the EVENT of the cue point that you
want to change on the cue list.
3 Touch the desired event (snapshot) on the event name list.
The event linked with the cue point is changed.