


73
Chapter 3 Menu
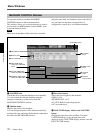
Chapter 3 Menu
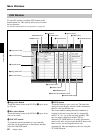
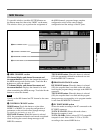
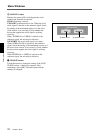
2 SAVE button
Touch this button to store the current title into the
selected title on the list. Select the media where the
current title is to be saved by the STORAGE MEDIA
buttons 7 before attempting to save.
Notes
• When executing “SAVE” on a floppy disk, the data
previously saved on the disk is cleared.
• After executing “SAVE”, do not turn off the power
while the cursor indication changes to an arrow
showing that the data has been processed or while
the LED on the floppy disk drive in on. If you turn
off the unit during this process, the title being saved
may be lost, as the unit requires time to write the
data in the flash memory or on the floppy disk.
3 DELETE button
Touch this button to delete the title selected on the
title list.
4 LOAD button
Touch this button to load the title selected on the title
list on the unit.
Note
When a title with different Fs setting is loaded, the
unit automatically restarts.
5 KEYBOARD button
Touch this button to open the KEYBOARD window
allowing you to enter the title name or memo.
6 FREE SPACE display
Displays the amount of free space for the media
selected by the STORAGE MEDIA button 7.
When FLOPPY DISK is selected, if the title is saved
on multiple floppy disks, the amount of free space for
each disk is displayed.
7 STORAGE MEDIA buttons
FLASH MEMORY button: Touch this button to
display the titles stored in the built-in flash memory
on the title list.
When the TITLE MANAGER window is opened, the
built-in flash memory is automatically selected.
FLOPPY DISK button: Touch this button to display
the titles stored on the floppy disk.
A dialogue “There are no titles or this an unformatted
disk. Check the media in the floppy disk drive.”
appears, in the following cases:
• A floppy disk is not inserted in the drive.
• The inserted disk is unformatted.
Notes
• When the titles have been saved in the floppy disk,
titles and their information are displayed. When no
title is saved on the floppy disk, the title list section
and INFORMATION section are blank.
• When data has been saved in 2 or more floppy disks
due to the size of the title, #1 or #2 is attached to the
title name displayed in the NAME box in the
INFORMATION section.
• When loading a title of two-disk set, be sure to load
the firs disk (#1 is displayed or blank in the NAME
box in the INFORMATION section). When the
second disk of a two-disk set should be inserted, the
dialog to replace the disk appears.
8 FDD OPERATION buttons
SCAN button: Touch this button so that a floppy disk
is scanned and the titles stored on the disk are
displayed. Be sure to touch this button when you
change the floppy disk.
FORMAT button: Touch this button to format the
floppy disk inserted in the floppy disk drive. All data
stored on the disk is erased. Titles displayed on the
title list disappear.
9 CURRENT TITLE CLEAR button
Touch this button, and a confirmation dialog box
appears. After confirming, the new title is created
based on the current sampling frequency and timecode
mode in the flash memory and is loaded on the unit as
a current title.
The new title is named “UNTITLED”.
Notes
• If a new title is created, all snapshot and automation
data current in the unit are cleared. It is
recommended that you save the data using the SAVE
button 2 before creating a new title.
• When a new title is created by the CURRENT
TITLE CLEAR button, the initial cue is
automatically created. Before using the unit in
automation mode, reset the initial cue data.
For detailed information on the cue operation, see page 96.