


104
Chaper 4 Operation Tips
Chapter 4 Operation Tips
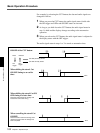
6 Drop in the item selected in step 4.
7 Adjust the level.
8 Repeat the adjustment by rewinding the tape as required.
9 Set the SAFE button to OFF after adjusting the level to the proper one.
10Start the tape recorder.
11Store the required duration by punching the information in/out.
You can drop out manually as required.
12Clear Punch in/out and WRITE HOLD modes.
Note
In WRITE HOLD mode, once the automation item is set in WRITE, this
WRITE mode is held until it is dropped out manually. If you do not use
the SAFE button and the punch in/out function, the automation data is
overwritten each time the tape recorder plays back.
Punching In/Punching Out
Punching in/punching out using the automation function
You can change automation data between specified durations by using the
punch in/out function.
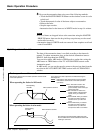
The following example shows a case where you want to remove noise
recorded on the tape by cutting the audio with the fader.
1 Find the timecodes of the start and end of the noise.
2 Set the timecodes found in step 1 in PUNCH IN TIME and PUNCH
OUT TIME windows, then press the AUTO button.
The automation data is stored during the duration displayed on the
display windows.
3 Rewind the tape.
4 Set the SAFE button on the panel to OFF so that it goes off.
5 Drop in the fader of the desired channel, and slide the fader down to
the minimum position.
The display turns in red, but data will not be written up to the PUNCH
IN point.
6 Start the tape recorder to play back.
Basic Operation Procedure