


69
Chapter 3 Menu
Chapter 3 Menu
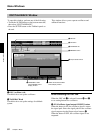
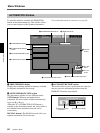
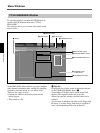
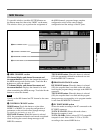
A Automation return mode button
Touch this button to select the mode that returns to the
previous data.
BUTT: Returns to the previous data quickly after the
DROP OUT.
RAMP: Ramps back to the previous position after the
DROP OUT.
HOLD TO NEXT: Holds the position after the DROP
OUT until the next automation move is replayed.
HOLD TO END: Holds the position after the DROP
OUT.
B RAMP frame display
Sets the time to return to the position stored in the
previous data in unit of frame.
You can set the desired number of frames using the m/
M buttons.
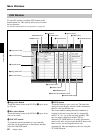
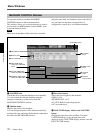
4 PUNCH IN/OUT section
This section allows you to punch in and out of
dynamic automation WRITE by sending the ON/OFF
signal or specifying the timecode.
FOOT SW button: Touch this button to active the
foot switch automation WRITE control. When this
button is not selected, the foot switch status is ignored.
AUTO button: Touch this button to enable the
PUNCH IN TIME/PUNCH OUT TIME display
windows. When this button is not selected, automation
data is stored regardless of the values in the PUNCH
IN/OUT TIME windows.
PUNCH IN TIME button and display window:
Touch this button to accept the time displayed on the
timecode display window on the Automation panel.
This time is then displayed in the windows.
You can enter the timecode using the ten keys by
touching the timecode on the display window.
Remember to press the ENTER button to accept this
value.
You can increase or decrease the numeric values using
the + / - buttons and the jog dial.
PUNCH OUT TIME button and display window:
Touch this button to accept the time displayed on the
timecode display window on the Automation panel.
This time is then displayed in the window.
You can enter the timecode using the ten keys by
touching the timecode on the display window.
Remember to press the ENTER button to accept this
value.
You can increase or decrease the numeric values using
the + / - buttons and the jog dial.
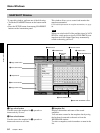
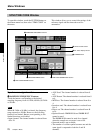
5 AUTOMATION ISOLATE tab
Selects the channels or functions that you want to
isolate from automation replay.
Touch this tab, then touch the CHANNEL button(s)
and FUNCTION button(s) for the functions you want
to isolate.
6 MAKE STATIC tab/qa MAKE STATIC
EXECUTE button
To select the channels whose automation data you
want to delete, touch the MAKE STATIC tab 6, then
touch the desired CHANNEL button(s).
Touching the MAKE STATIC EXECUTE button after
selecting the channel results in clearing all the
automation data from that channel.
7 Channel buttons (CH1 to PGM)
After selecting the AUTOMATION ISOLATE tab 5
(or MAKE STATIC tab 6), select the channel that
you want to isolate from automation replay (or the
channel that you want to delete) using these channel
buttons.
8 ALL OFF button
Touch this button so that no channels are selected.
9 ALL ON button
Touch this button to select all channels.
0 FUNCTION ISOLATE buttons
Touch the button to remove the mixer’s functions from
automation replay. The function corresponding to the
selected button is not loaded when replaying
automation files.