


22
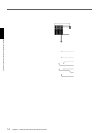
Chapter 2 Locations and Functions of Parts and Controls
Chapter 2 Locations and Functions of Parts and Controls
Locations and Functions of Parts and Controls
STUDIO LS SOLO MODE HEADPHONES
SETUP
DIM CUT
MTRAUXPGM
20
30
40
50
60
10
6
4
0
OVER
PGM 2T-1 2T-2
CANCEL
SOLO AFL PFL
1
LR
PGM
20
30
40
50
60
10
6
4
0
OVER
2
20
30
40
50
60
10
6
4
0
OVER
3
20
30
40
50
60
10
6
4
0
OVER
4
20
30
40
50
60
10
6
4
0
OVER
5
20
30
40
50
60
10
6
4
0
OVER
6
20
30
40
50
60
10
6
4
0
OVER
78
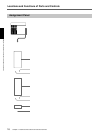
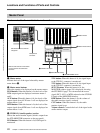
SOLO button on the channel
strip panel
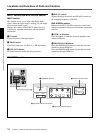
Headphones
connector
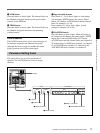
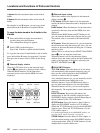
1 Master meters
2 Master meter buttons
3 STUDIO LS section
4 SOLO MODE section
5 HEADPHONES control
Buttons and controls in this section
are not used for the automation
functions.
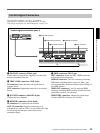
Master Panel
Master meter/studio monitor/solo mode sections
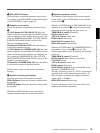
1 Master meters
Indicate the level of the signal selected by master
meter button 2.
2 Master meter buttons
Select the signals to be displayed on the master meters.
PGM button: When this button is lit, the levels of the
PGM output signal are displayed on master meters 1
and 2.
AUX button: When this button is lit, the levels of the
output signals from AUX buses 1 to 8 are displayed on
master meters 1 to 8.
MTR button: When this button is lit, the levels of the
output signals from MTR buses 1 to 8 are displayed on
master meters 1 to 8.
3 STUDIO LS (studio speaker) section
Selects the studio monitor signal (which is output from
the STD MONITOR connector on the rear panel).
PGM button: When this button is lit, PGM signal is
monitored.
2T-1 button: When this button is lit, the signal input
to the 2TR IN 1 connector is monitored.
2T-2 button: When this button is lit, the signal input
to the 2TR IN 2 connector is monitored.
SET UP button: When this button is lit, the
MONITOR window (page 59) is displayed, showing
the STUDIO LS page. You can monitor the source
signal (EXT, AUX, or MTR) selected on the STUDIO
LS page of the MONITOR window.
DIM button: When this button is lit, the volume of
the studio monitor signal is reduced.
CUT button: When this button is lit, the studio
monitor signal is cut.
Volume control: Controls the level of the signal to the
studio monitor output.