


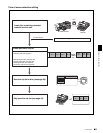

Chapter 5 Scene Selection
67
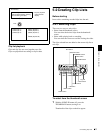
5-2 Creating Clip Lists
1
Display the CLIP menu.
See “To display the CLIP menu” (page 68).
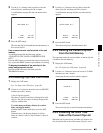
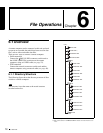
2
Use the F or f button to move the cursor to SAVE, and
then press the g button.
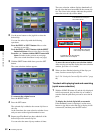
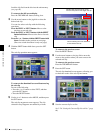
A list of clip lists appears.
“NEW FILE” is displayed for clip lists without any
registered data.
The date of creation or the title is displayed for each
clip list.
To switch between display of dates of creation,
titles, and clip list names
With the SHIFT button held down, press the SET
button.
With each press, the display changes as follows.
Dates of creation > titles > clip list names > dates of
creation...
3
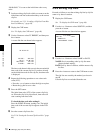
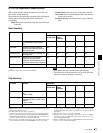
Use the F or f button or the jog dial to select the
desired clip list, and then press the g button.
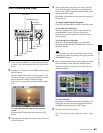
A confirmation message like the one shown below
appears.
To cancel the save
Press the MENU button.
4
Press the SET button.
The current clip list is saved to disc.
To assign a title to a clip list
Use the supplied PDZ-1 Proxy Browsing Software.
For details, see the PDZ-1 online help.
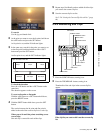
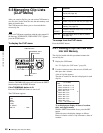
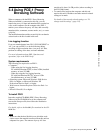
ACCESS
SHUTTLE JOG
THUMB
NAIL
ESSENCE
MARK
MENU
S.SEL
SET
RESET
SHIFT
TOP F REV
ALL/CH-1 CH-2 CH-3 CH-4
TC
F FWD
AUDI O
END
REC
PRESET
VARIABLE
PB
PREV NEXTPLAY STOP REC
CLIP
MENU
SYSTEM
MENU
MONITOR
SEL
METER
SEL
HOLD
COUNTER
SEL
SUB
CLIP
MARK1
MARK2
IN
OUT
KEY INHI
ON
OFF
NETWORK
LOCAL
REMOTE
F-RUN
R-RUN
PRESET
REGEN
INT
EXT
RP188
L/ST/R
SET button
g/OUT button
F/f buttons
SAVE
E0001 04/08/08 21:57
E0002 04/08/24 11:15
E0003 04/08/25 15:30
E0004 NEW FILE
E0005 NEW FILE
E0006 NEW FILE
E0007 NEW FILE
E0009 NEW FILE
TITLE : SHIFT+SET KEY
E0008 NEW FILE
CLIP MENU
SAVE E0005 OK ?
SAVE : SET KEY
TO MENU : MENU KEY
SAVE CLIP LIST