


Chapter 4 Recording/Playback
48
4-1 Recording
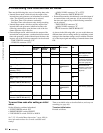
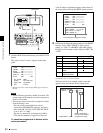
To directly record SMPTE RP-188 LTC in an SDI
signal
Connect an SDI signal containing SMPTE RP188
LTC to the SDI IN connector. Press the VIDEO
INPUT SEL button and, while viewing the time data
display or the video panel, select SDI.
2
Set the PRESET/REGEN switch to PRESET, and set
the INT/EXT/RP188 to one of the following.
To record TC input to the TC IN connector, or
i.LINK TC: EXT
To record SMPTE RP188 LTC: RP188
For details of menu setting operations, see Chapter 7
“Menus” (page 89).
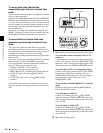
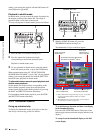
4-1-3 Recording Operation
To record, proceed as follows.
1
Insert a disc.
For details, see 3-6-4 “Loading and Unloading a
Disc” on page 38.
2
Hold down the REC button, and press the PLAY
button.
Recording starts.
3
To stop recording, press the STOP button.
If the disc becomes full
Recording stops and the message “ALARM DISC END.”
appears on the video panel.
Notes
• The shortest clip that can be recorded is 2 seconds long.
Even if recording start and stop operations are performed
within 2 seconds, a 2-second clip is recorded.
• The maximum number of clips that can be recorded is
300. If the loaded disc already contains 300 clips,
recording with the REC button is not possible. (The
message “Disc Full!” appears in the time data display.)
• Do not allow the unit’s primary power to be lost during
recording.
1)
This could cause the clip being recorded to
be lost. (See 3-6-7 “Handling of Discs When Recording
Does Not End Normally (Salvage Function)” on page
40.)
1) Primary power is lost when the AC power switch on the rear panel is
turned off, the AC power cord is disconnected, DC power is turned off, the
battery pack is exhausted, the battery pack is removed, and so on.
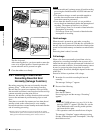
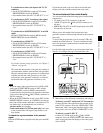
To record essence marks
A shot mark 1 essence mark or shot mark 2 essence mark
is recorded if you hold down the F/MARK1 or f/MARK2
button and press the SET button during recording.
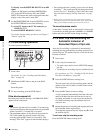
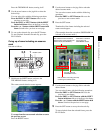
4-1-4 Auto Clip List Recording for
Automatic Inclusion of
Recorded Clips in Clip Lists
Auto clip list recording is a function for automatically
including the clips generated by recording operations in a
selected clip list. The updated clip list is saved to the disc.
Proceed as follows.
1
Insert a disc.
2
Load a clip list from the disc.
• To create a new clip list, load a NEW FILE (empty)
clip list.
• To add clips to an existing clip list, load that clip list.
For operations, see 5-3-1 “Loading a Clip List From
Disc Into Unit Memory” (page 68).
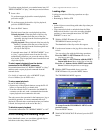
3
Press the SUBCLIP button, turning it on.
The unit enters auto clip list recording mode, and the
number of the clip list which is loaded in the current
clip list appears.
4
Press the REC button to start recording.
A clip is generated automatically from the video and
audio recorded in the interval from start to stop of
recording, and added as a sub clip to the current clip
list. When recording stops, the updated clip list is
written to disc.
5
Repeat the process of recording and stopping until you
have included all the required clips.
To change the registered clip list, repeat step 2 to load
the desired clip list.
To exit auto clip list recording mode
Press the SUBCLIP button, turning it off.
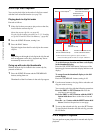
ACCESS
SHUTTLE JOG
THUMB
NAIL
ESSENCE
MARK
MENU
S.SEL
SET
RESET
SHIFT
TOP F REV
ALL/CH-1 CH-2 CH-3 CH-4
TC
F FWD
AUDI O
END
REC
PRESET
VARIABLE
PB
PREV NEXTPLAY STOP REC
CLIP
MENU
SYSTEM
MENU
MONITOR
SEL
METER
SEL
HOLD
COUNTER
SEL
SUB
CLIP
MARK1
MARK2
IN
OUT
KEY INHI
ON
OFF
NETWORK
LOCAL
REMOTE
F-RUN
R-RUN
PRESET
REGEN
INT
EXT
RP188
L/ST/R
2 3