


Chapter 2 Names and Functions of Parts
15
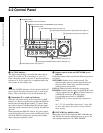
2-2 Control Panel
speed varies in the range ±1 times normal speed, according
to the rotation rate of the jog dial. There are no detents.
Normally, you press the JOG button before turning the jog
dial, but it is also possible to make a setting to enable jog
mode directly by turning the dial (set extended menu item
101 “SELECTION FOR SEARCH DIAL ENABLE” to
“dial”).
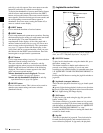
e Shuttle dial
Turn this for playback in shuttle mode. Turn clockwise for
forward direction playback, and counterclockwise for
reverse direction playback. In shuttle mode, the playback
speed varies in the range ±20 times normal speed (using
MPEG IMX/DVCAM), according to the angular position
of the shuttle dial. The shuttle dial has a detent at the center
position, for still image playback.
Normally, you press the SHUTTLE button before turning
the shuttle dial, but it is also possible to make a setting to
enable shuttle mode directly by turning the dial (set
extended menu item 101 “SELECTION FOR SEARCH
DIAL ENABLE” to “dial”).
Note
When extended menu item 101 “SELECTION FOR
SEARCH DIAL ENABLE” is set to “dial,” after using the
shuttle dial, return it to the center position. If the shuttle
dial is not in the center position, it is possible occasionally
for vibration from other operations to activate the dial, and
start playback in shuttle mode.
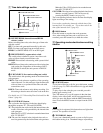
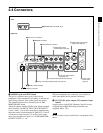
4 Audio settings section
a VARIABLE (audio level adjustment selector)
switch
This selects which of the input audio and playback audio
has the level adjusted by the ALL/CH-1, and CH-2 to CH-
4 adjustment knobs.
REC: Adjust the input audio levels. The playback audio
levels are fixed at their preset values.
PRESET: Do not adjust the audio levels.
PB: Adjust the playback audio levels. The input audio
levels are fixed at their preset values.
b ALL/CH-1, CH-2 to CH-4 (audio level) adjustment
knobs
Depending on the setting of the VARIABLE switch, these
adjust the input audio or playback audio levels of channels
1 to 4.
By the setting of extended menu item 131 “AUDIO
VOLUME,” you can enable the ALL/CH-1 knob to
simultaneously adjust all eight channels. When this
simultaneous adjustment is enabled the ALL indicator
lights.
c AUDIO METER SEL (selection) button
When using MPEG IMX format in eight-channel mode,
select whether the audio level meters should display
channels 1 to 4 or channels 5 to 8.
Pressing this button toggles the selection, and the audio
level meter channel display also changes.
The factory default is for channels 1 to 4 to be selected.
d AUDIO MONITOR SEL (selection) button
This button selects two channels from among the up to
eight audio signal channels. You can monitor the audio of
the selected channels (the left and right channels in the
case of stereo output) with the PHONES jack on the front
panel and the built-in speaker.
Pressing this button cycles through the following five
channel combinations.
• tr1/2: Channels 1 (left) and 2 (right)
• tr3/4: Channels 3 (left) and 4 (right)
• tr5/6: Channels 5 (left) and 6 (right)
• tr7/8: Channels 7 (left) and 8 (right)
• MENU: Audio channels selected with extended menu
item 837 and 838 “AUDIO MONITOR CHANNEL
ARRANGE”
The factory default is for channels 1 (left) and 2 (right) to
be selected.
You can select whether to monitor both of the selected
channels or only one, by pressing this button with the
SHIFT button held down. Each press selects stereo, right,
or left.
ST: Stereo audio is output from the PHONES jack.
Monaural audio, the left and right channels mixed, is
output from the built-in speaker.
R: The right channel audio is output from the PHONES
jack and the built-in speaker.
L: The left channel audio is output from the PHONES jack
and the built-in speaker.
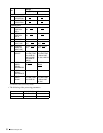
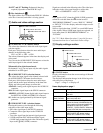
ALL/CH-1 CH-2 CH-3 CH-4
AUDIO
REC
PRESET
VARIABLE
PB
MONITOR
SEL
L/ST/R
METER
SEL
1 VARIABLE switch
ALL indicator
2 ALL/CH1, CH-2 to CH4
adjustment knobs
3 AUDIO METER SEL button
4 AUDIO MONITOR SEL button