


34
3-3 Setup / 3-4 Setting the Date and Time
Chapter 3 Preparations
3-3 Setup
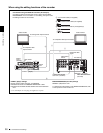
The principal setup operations before operating this unit
can be carried out using setup menus.
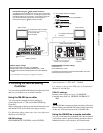
The setup menus of this unit comprise a basic setup menu
and an extended setup menu. The contents of these menus
are as follows.
Basic setup menu:
• Items relating to the hours meter
• Items relating to operation
• Items relating to menu banks
Extended setup menu:
• Items relating to control panels
• Items relating to the remote control interface
• Items relating to editing operations
• Items relating to preroll
• Items relating to disc protection
• Items relating to the time code, metadata, and UMID
• Items relating to video control
• Items relating to audio control
• Items relating to digital processing
For detailed information about the items, except for the
basic menu items relating to the hours meter, of these
menus and how to use them, see Chapter 7 “Menus” (page
89). For detailed information about menu operations
relating to the hours meter, see 8-1-1 “Digital Hours
Meter” (page 120).
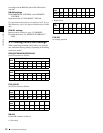
This unit allows four different sets of menu settings to be
saved in what are termed “menu banks” numbered 1 to 4.
Saved sets of menu settings can be recalled for use as
required.
For more information about the menu banks, see “Menu
bank operations (menu items B01 to B13)” (page 96) and
the description of maintenance menu item “SETUP
MAINTENANCE” — “SETUP BANK4” (page 113).
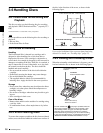
3-4 Setting the Date and
Time
When using this unit for the first time, you should set the
date and time as follows.
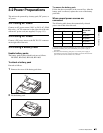
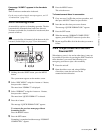
1
Holding down the SHIFT button, press the MENU
button.
The system menu appears on the video panel.
2
Select “DATE/TIME PRESET” using the F button or
f button, then press the g button.
The date and time setting screen appears on the
monitor, allowing you to set the following items.
• YEAR: Calendar year
• MONTH: Month
• DAY: Day
• TIME: Time
• TIME ZONE: Time zone (Difference from UTC)
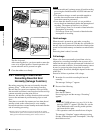
3
Set the date, time and time zone.
You can change the setting of the flashing digits.
To change the flashing digits
Use the arrow buttons (G, g).
To increase or decrease the values of the flashing
digits
Use the arrow buttons (F, f) or jog dial.
4
Press the SET button.
The date, time and time zone settings are stored.
To return to the previous menu page
Press the MENU button.
To exit the menu
Press the MENU button twice in succession.
ACCESS
SHUTTLE JOG
THUMB
NAIL
ESSENCE
MARK
MENU
S.SEL
SET
RESET
SHIFT
TOP F REV
ALL/CH-1 CH-2 CH-3 CH-4
TC
F FWD
AUDI O
END
REC
PRESET
VARIABLE
PB
PREV NEXTPLAY STOP REC
CLIP
MENU
SYSTEM
MENU
MONITOR
SEL
METER
SEL
HOLD
COUNTER
SEL
SUB
CLIP
MARK1
MARK2
IN
OUT
KEY INHI
ON
OFF
NETWORK
LOCAL
REMOTE
F-RUN
R-RUN
PRESET
REGEN
INT
EXT
RP188
L/ST/R
32,34
1