


Chapter 5 Scene Selection
66
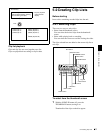
5-2 Creating Clip Lists
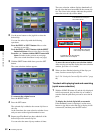
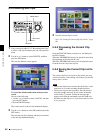
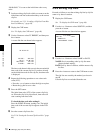
5-2-4 Deleting Sub Clips
1
Carry out steps 1 to 4 of 5-2-2 “Reordering Sub Clips”
to select a sub clip and display the sub clip operation
menu.
2
Use the F or f button to select DELETE, and then
press the SET button.
The sub clip deletion screen appears.
To cancel the deletion and return to the previous
screen
Do one of the following
•Use the G or g button to select CANCEL, and then
press the SET button.
• Press the RESET button.
The screen returns to the sub clip thumbnail display.
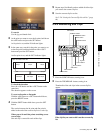
3
Use the G or g button to select OK, and then press the
SET button.
The selected sub clip is deleted, and the screen returns
to the sub clip thumbnail display.
4
Save the current clip list to disc.
See 5-2-6 “Saving the Current Clip List to Disc” (page
66).
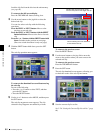
5-2-5 Previewing the Current Clip
List
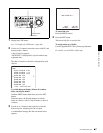
Press the SUBCLIP button, turning it on, and then press
the PLAY button.
When the THUMBNAIL button is lit, playback starts from
the beginning of the selected sub clip.
When the THUMBNAIL button is not lit, playback starts
from the first sub clip in the clip list.
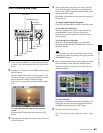
5-2-6 Saving the Current Clip List to
Disc
The current clip list is not saved to disc unless you carry
out this procedure. After editing clip list data, you should
always save it to disc.
Notes
• The current clip list is not saved to disc if the disc’s write
protect tab is set to the recording disabled position.
• Unless you carry out this procedure, the unit does not
enter the standby state even if you set the on/standby
switch to the 1 position. Follow the message that
appears and return the on/standby switch to the & side,
and then save the clip list or, if you do not need it, clear
it (see page 69).
ACCESS
SHUTTLE JOG
THUMB
NAIL
ESSENCE
MARK
MENU
S.SEL
SET
RESET
SHIFT
TOP F REV
ALL/CH-1 CH-2 CH-3 CH-4
TC
F FWD
AUDI O
END
REC
PRESET
VARIABLE
PB
PREV NEXTPLAY STOP REC
CLIP
MENU
SYSTEM
MENU
MONITOR
SEL
METER
SEL
HOLD
COUNTER
SEL
SUB
CLIP
MARK1
MARK2
IN
OUT
KEY INHI
ON
OFF
NETWORK
LOCAL
REMOTE
F-RUN
R-RUN
PRESET
REGEN
INT
EXT
RP188
L/ST/R
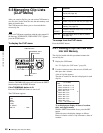
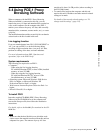
SET button
RESET button
G/IN button
g/OUT button
F/f buttons