


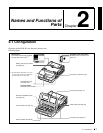


Chapter 2 Names and Functions of Parts
14
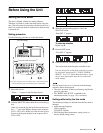
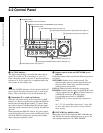
2-2 Control Panel
each clip or sub-clip appear. Press once more to turn the
button off, and return to a whole-screen display.
To display the thumbnails of essence mark frames (frames
with an essence mark attached), hold down the SHIFT
button, and press this button. The essence mark selection
menu appears. Select the desired type of essence mark, and
the corresponding essence mark frames appear in
thumbnails. Press once more, turning the button off, to
return to a whole-screen display.
c SHIFT button
Use to switch the functions of various buttons.
d MENU button
Use for setup menu and system menu operations. Pressing
this button displays the setting of a setup menu item in the
time data display. The same information is also
superimposed on the displays of the video panel and a
monitor connected to this unit (see page 94). Press once
more to return to the original display. The system menu
(see page 117) appears in the time data display, in the
video panel, and on an external monitor, when you press
this button with the SHIFT button held down. Press this
button again to escape from the system menu.
e SET button
Use for setup menu settings (see page 94), scene selection
(thumbnail search) settings, and so on.
The scene selection window or a menu for sub clip
operations appears when you press this button with the
SHIFT button held down with either of the following
displayed. The window or menu appears in the video
panel, and on an external monitor.
When a thumbnail screen is displayed: The scene
selection window (see page 62) appears.
When a sub clip thumbnail is displayed: A sub clip
operation menu (see page 64) appears.
f RESET button
Press to reset the counter. This is also used to cancel or
abandon setup menu settings and scene selection
(thumbnail search).
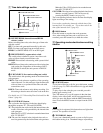
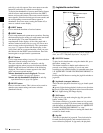
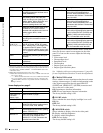
3 Jog/shuttle control block
For details of playback operations with these buttons and
dials, see 4-2-2 “Playback Operation” on page 51.
a SHUTTLE button
To play back in shuttle mode using the shuttle dial, press
this button, turning it on.
This button switches to shuttle mode whenever it is
pressed, even during recording. If you do not want
recording to stop with this button, set extended menu item
145 “MODE KEY ENABLE DURING RECORDING” to
“stop.”
Pressing the JOG button or turning the jog dial switches to
jog mode.
b Jog/shuttle transport indicators
These show the playback direction in jog or shuttle speed
mode.
b (green): Lights during playback in the reverse direction.
B (green): Lights during playback in the forward direction.
x (red): Lights during still image display.
c JOG button
To play back in jog mode using the jog dial, press this
button, turning it on.
This button switches to jog mode whenever it is pressed,
even during recording. If you do not want recording to stop
wih this button, set extended menu item 145 “MODE KEY
ENABLE DURING RECORDING” to “stop.”
Pressing the SHUTTLE button or turning the shuttle dial
switches to shuttle mode.
d Jog dial
Turn this for playback in jog mode. Turn clockwise for
forward direction playback, and counterclockwise for
reverse direction playback. In jog mode, the playback
SHUTTLE JOG
1 SHUTTLE button
2 Jog/shuttle transport
indicators
3 JOG button
4 Jog dial
5 Shuttle dial