


Chapter 4 Recording/Playback
49
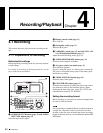
4-2 Playback
4-2 Playback
This section describes playback of video and audio.
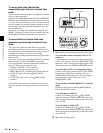
Disc playback start position
Although this unit uses optical discs, it is designed to offer
the most convenient features of tape playback by VTRs.
One of these is the playback start position, which works in
the same way as tape, as described below.
After playback stop
The unit stops at the position where the STOP button was
pressed.
Press the PLAY button to resume playback at the stop
position.
After recording
The unit stops at the position where recording ended.
To play back a clip, press the PREV button to move to the
start frame of any clip, or press the PREV button with the
PLAY button held down to move to any position.
After disc insertion
The unit stops at the position of the disc when it was most
recently ejected.
Press the PLAY button to resume playback at the most
recent position.
The playback position is saved to the disc when the disc is
ejected, which allows playback to start at that position
whenever it is loaded into any XDCAM player.
Note
This function is not available when the Write Inhibit tab of
the disc is set to the recording disabled position, and when
extended menu item 310 “REC INHIBIT” is set to “on.”
The REC INHI indicator may light when neither of the
above are true if the format of recorded sections on the disc
is not the same as the recording settings of this unit. In this
case, the playback position can be saved to the disc.
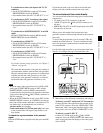
4-2-1 Preparations for Playback
Button/switch settings
Before beginning playback, make any necessary button/
switch settings.
For details of the settings of the buttons/switches, see the
pages indicated in parenthesis.
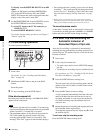
a Remote control switch (page 12)
Set to LOCAL.
b On/standby switch (page 12)
Indicator (`) lit green.
c VARIABLE switch (page 15) and ALL/CH-1, CH-
2 to CH-4 adjustment knobs (page 15)
Adjust the audio playback levels.
d AUDIO MONITOR SEL button (page 15)
Select the audio channels to monitor.
e AC power switch (rear panel) (page 11)
Set to the ` (on) position.
If you are using DC power or a battery pack, connect the
DC power or mount the battery pack on the battery pack
shoe before playback.
f COUNTER SEL button (page 13)
Select the data (elapsed playback time, time code value or
user bit data) to be displayed in the time data display.
When displaying the time code value, select TC or VITC
with extended menu item 629 “TC SELECT.”
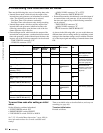
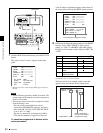
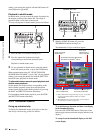
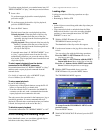
Adjusting video processing parameters
You can adjust the following video processing parameters.
• Video output level
• Chroma output level
• Setup/black level
• Chroma phase
• Output signal sync phase
• Output signal subcarrier phase
AUDIO
VIDEO
INPUT SEL
WARNING
KEY INHI REC INHI
INPUT CH INPUT SEL STATUS LIGHT MONITOR
HLOFFOFFON
OFFON
-30
dB
-12
-20
-40
-60
0
CH
- 15
DATA
OVER
-30
dB
-12
-20
-40
-60
0
CH-
26
DATA
OVER
-30
dB
-12
-20
-40
-60
0
CH-
37
DATA
OVER
-30
dB
-12
-20
-40
-60
0
CH-
48
BATT E F
DATA
OVER
VITC
HOURS MINUTES SECONDS FRAMES
COUNTER HOLDVIUB
PB EXT-LKNDF
DISC E B
ACCESS
SHUTTLE JOG
THUMB
NAIL
ESSENCE
MARK
MENU
S.SEL
SET
RESET
SHIFT
TOP F REV
ALL/CH-1 CH-2 CH-3 CH-4
TC
F FWD
AUDI O
END
REC
PRESET
VARIABLE
PB
PREV NEXTPLAY STOP REC
CLIP
MENU
SYSTEM
MENU
MONITOR
SEL
METER
SEL
HOLD
COUNTER
SEL
SUB
CLIP
MARK1
MARK2
IN
OUT
KEY INHI
ON
OFF
NETWORK
LOCAL
REMOTE
F-RUN
R-RUN
PRESET
REGEN
INT
EXT
RP188
L/ST/R
CHARACTER
VITC
PROCESS
CONTROL
1
2
3
4
5
6