


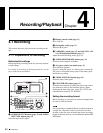


Chapter 4 Recording/Playback
43
4-1 Recording
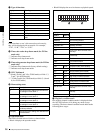
To set the video recording format
Use basic menu item 031 “RECORDING FORMAT” to
select the video recording format from MPEG IMX 50
Mbps, MPEG IMX 40 Mbps, MPEG IMX 30 Mbps, and
DVCAM.
The factory default setting is IMX50.
For details of the basic menu operations, see 7-2-2 “Basic
Menu Operations” on page 94.
To set the audio recording format
When using the MPEG IMX 50Mbps/40Mbps/30Mbps
for video: Use the maintenance menu item “AUDIO
CONFIG” to select 16 bits/8 channels or 24 bits/4
channels.
The factory default setting is 16 bits/8 channels.
When using the DVCAM format for video: Selection is
not necessary. The format of 16 bits/4 channels is
selected automatically.
For details of the maintenance menu operations, see 7-4-2
“Maintenance Menu Operations” on page 114.
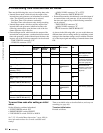
File writing formats with FAM and FTP
connections
It is not necessary to set the video recording format
(IMX50/IMX40/IMX30/DVCAM) and the audio
recording format (16bit × 8ch/24bit × 4ch) before writing
files.
The file formats which can be written to the disc depend on
whether clips are already recorded on the disc.
When you insert a disc with no recorded clips: Files in
all of the above formats can be written.
When you insert a disc with recorded clips: Files in the
same video and audio formats as the clips on the disc
can be written.
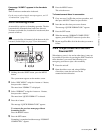
Making thumbnail image settings
As required, you can select which frame to display as a
clip’s thumbnail image. (When the unit is shipped from the
factory, it is set up to display the first frame as the
thumbnail.)
For example, if all clips have the same image in their first
frames, you can specify a frame a few seconds after the
start of the clip, so that thumbnails will not all show the
same image.
To specify the frame to use as the thumbnail
image
Set extended menu item 143 “INDEX PICTURE
POSITION” to a number in the range from 0 to 10, in units
of 1 second.
See 7-3-2 “Extended Menu Operations” (page 108) for
more information about how to make extended menu
settings.
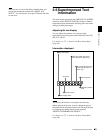
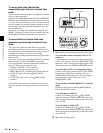
To adjust the audio recording levels
When carrying out audio recording at a reference
level
Set the VARIABLE switch (see page 15) to PRESET. The
audio signals will be recorded at a preset reference level.
Use the maintenance menu item “AUDIO CONFIG” to set
the audio input level and reference level.
For details of the maintenance menu operations, see 7-4-2
“Maintenance Menu Operations” on page 114.
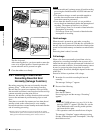
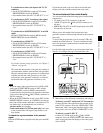
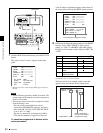
Manually adjusting the audio recording
levels
Set the VARIABLE switch (see page 15) to REC and
adjust the ALL/CH-1 and CH-2 to CH-4 adjustment knobs
so that the audio level indications on the audio level meters
(see page 18) do not exceed 0 dB for a maximum volume.
Carry out the adjustment in E-E mode.
To select the E-E mode, see extended menu item 108
“AUTO EE SELECT.”
To adjust the audio recording levels for channels 1 to 8
simultaneously, set extended menu item 131 “AUDIO
VOLUME” to “all” and turn the ALL/CH-1 adjustment
knob.