


Chapter 2 Names and Functions of Parts
13
2-2 Control Panel
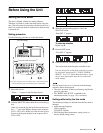
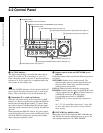
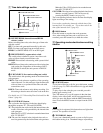
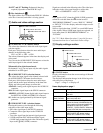
1 Time data settings section
a INT/EXT/RP188 (internal/external/RP188
selector) switch
Before recording time code, select the type of time code
with this switch.
INT: Use time code generated internally by this unit.
EXT: Use time code input from an external source.
RP188: Use SMPTE RP188 LTC in an SDI signal.
b PRESET/REGEN (regeneration) switch
This switch selects whether to preset a new time code
value or follow already recorded time code.
PRESET: Record time code starting with a preset initial
value.
REGEN: Record time code continuous with existing time
code on the disc. Regardless of the setting of the F-
RUN/R-RUN switch, the unit operates in R-RUN
mode.
c F-RUN/R-RUN (free run/recording run) switch
This switch selects the operating mode of the internal time
code generator.
F-RUN: Time code advances regardless of the operating
state of the unit. Use this setting to align the time code
with real time or to synchronize the time code with
external time code.
R-RUN: Time code advances only during recording. Use
this setting to obtain consecutive time code on the disc.
For details, see 4-1-2 “Recording Time Code and User Bit
Values” (page 44).
d COUNTER SEL button
This cycles the data displayed in the time data display
through the sequence TC, UB, and COUNTER.
TC: The playback time code read by the internal time code
reader, or the time code generated by the internal time
code generator.
Make the TC or VITC selection in extended menu item
629 “TC SELECT.”
UB: The user bits inserted in the playback time code, or
user bits generated by the internal time code generator.
Make the UB or VIUB selection in extended menu
item 629 “TC SELECT.”
COUNTER: The elapsed recording/playback time (hours,
minutes, seconds, frames). This can be reset by
pressing the RESET button (see page 14).
The corresponding indicator above the time data display
lights according to the setting.
You can also synchronize timecode with the time of the
internal clock. For details, see “To set time code to the
time of the internal clock” (page 45).
e HOLD button
Press this button to stop the time code generator.
Also, when setting the time code or user bits to be
recorded, press this button first, to hold the values.
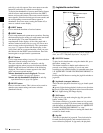
2 Operating mode selection/menu setting
section
a SUBCLIP button
To play back following a clip list, press this button, turning
it on (see page 54). This is also effective for jog and shuttle
operations.
To play clips in the order they are recorded, press this
button again, turning it off.
The CLIP menu (see page 68) appears in the time data
display, in the video panel, and on an external monitor
when you press this button with the SHIFT button held
down. Press the MENU button to escape from the CLIP
menu.
Note
If no clip list is registered, this button does not light when
pressed. The operation is invalid.
b THUMBNAIL button
To carry out a thumbnail search or create a clip list, press
this button turning it on. Thumbnail images representing
TC
HOLD
COUNTER
SEL
F-RUN
R-RUN
PRESET
REGEN
INT
EXT
RP188
1 INT/EXT/RP188 switch
2 PRESET/REGEN switch
3 F-RUN/R-RUNswitch
4 COUNTER SEL button
5 HOLD button
THUMB
NAIL
ESSENCE
MARK
MENU
S.SEL
SET
RESET
SHIFT
CLIP
MENU
SYSTEM
MENU
SUB
CLIP
1 SUBCLIP button
2 THUMBNAIL button
3 SHIFT button
4 MENU button
5 SET button
6 RESET button