


Control ~ Remote Builder
88
Technical Services Group ~ 1-800-283-5936 (USA) ~ 1-801-974-3760
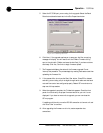
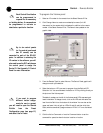
To program the Volume panel
1. Select an ID number for the remote from the Select Remote ID list.
2. Click Change Name to create a more descriptive name (limit 20
characters) for the remote which is displayed in addition to the remote
number in the Select Remote ID list. The name is also updated on the
graphic label.
3. From the Remote Type list, select Volume. The Control Panel graphic will
change to match your selection.
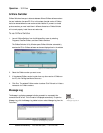
4. Select the button or LED you want to program from the Button/LED
Selection list. You can also select the button or LED by clicking directly on
the picture of the Volume panel.
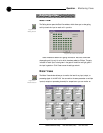
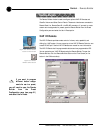
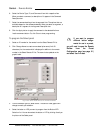
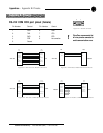
The default numbers on the left of the Volume panel LEDs represent gain
levels in decibels. To change a level, click on the LED and then select the
level from the Gain list at the bottom of the window. You can also set the
upper and lower limits of gain on LEDs L2 and L8 and then click Auto
Scale, which automatically assigns values to LEDs L3-L7 on a distributed
scale.
5. Click the Active Command or Inactive Command button to set the
command for operation when the button is active or inactive.
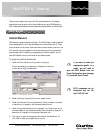
Figure 6.5. Volume Panel selected in the Remote Builder
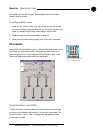
Each Control Panel button
can be programmed to
respond like a momentary
or latching button. A command can
be programmed to activate or
deactivate a particular function.
✍
If you want to program
different button assign-
ments for use in a preset,
you will need to open the Remote
Builder from the Preset
Configuration pane (see page 61)
and select Use in Preset.
✍
Up to six control panels
(or five control panels and
one IR remote) can be
connected to each of the RS-485
ports. In addition to selecting the
ID number in the software, you will
also need to use the DIP switches on
the control panel to assign the
Device ID. See Appendix C: Control
Panel for more information.
✍