


61
Advanced Configuration ~ Presets
Technical Services Group ~ 1-800-283-5936 (USA) ~ 1-801-974-3760
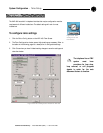
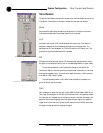
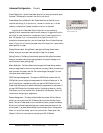
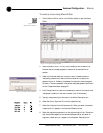
Figure 4.5. Preset Macros Window
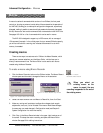
Preset Description. Use the Preset Description box for entering information about
the preset. This description is stored in the site file, not the unit.
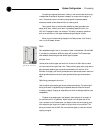
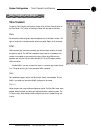
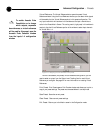
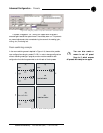
Preset Mask Control/Status B. With Preset Mask Control Status B you can
require an active high
(H) or active low (L) con
tact on a control pin (1–19 odd
numbers) or combination of several contacts in order to run the preset.
A typical use for Preset Mask Control Status B is a room combining
application which uses automatic partitions with sensors or triggers which set the
pin to high (H) when the partition is closed and to low (L) when the partition is
open. For example, if pin 1 is connected to the first partition and Pin 3 is
connected to the second partition, then the Preset Mask Control Status B settings
shown in Figure 4.4 will activate the preset when the first partition is open and the
second partition is closed.
Change Preset Label. Change Preset Label opens the Change Preset Labels
window, where you can create a short description (label) for the preset.
Gating Controls. The Gating Controls button opens the Gating Controls window,
where you can select and configure gating groups for this preset. See page 41 for
more information about gating groups.
Macro Selection. The Macro Selection button opens the Preset Macros window,
where you assign specific macros to the preset you’re creating. Select the macros you
want to use with this preset, then click OK to save changes. See page 67 for more
information about creating macros.
GPIO Command Assignment. This opens the GPIO Builder window. With the
GPIO builder, you can configure pin assignments for the Control/Status port A. The
Use in Preset option is available only when you open the GPIO Builder from the
Preset mode and allows you to create customized pin assignments for each preset. If
you open GPIO Builder from the toolbar while in Configuration Mode, or from the
Flow Screen, you will not have the Use in Preset option. See Chapter 6: Control for
instructions on configuring pin assignments.
Remote Assignment. This opens the Remote Builder window. With the Remote
builder, you can configure the XAP IR Remote Control and the ClearOne Control
Panels. The Use in Preset selection box is available only when you open the Remote
Builder from the Preset Mode and allows you to create customized control for the
current preset. If you open Remote Builder from the toolbar while in Configuration
Mode, or from the Flow Screen, you will not have the Use in Preset option. See
Chapter 6: Control for instructions on configuring the XAP IR Remote.
Figure 4.4. Preset Mask
Control/Status B