Setting Up HDMI Systems
67
Instruction Manual – HDMI-UTPRO-0808
When the system is initially set up, each first time switch to an output must go through the lengthy authentication
process. After the initial authentication, the system “remembers” the destination device and significantly reduces the
latency.
Note: If necessary, EDID Programmer software (located at www.amx.com) is available for re-programming
the HDMI connectors (see page 101).
We recommend using either of the following procedures at installation or whenever source and/or destination devices are
changed, so that the system is primed to accept all destinations (given any limitations on the number of sinks each source
supports; see page 61).
To initialize (prime) system for InstaGate
®
Technology with control panel or software:
Note: The following process can take up to as much as a minute and a half for each one-to-all routing
command to complete.* It is normal for the remaining monitors to lose content as each new output is added.
1. Check to be sure all source and destination devices attached to the HDMI UTPro are powered up.
2. Route each input to all of the outputs.
Or
Route each input to all of the runtime intended outputs.
* Time for initial authentication can vary noticeably for different source and destination devices.
To initialize (prime) system for InstaGate
®
Technology using BCS commands:
1.
Check to be sure all source and destination devices attached to the HDMI UTPro are powered up.
2. Plug one end of a null modem serial cable into the Control (RS-232) port on the enclosure. The pinout for the DB-9
connector is: 5 GND to 5 GND, 2 RXD to 3 TXD, and 3 TXD to 2 RXD.
3. Plug the other end of the serial cable into the serial port on the PC.
4. Open a terminal emulation program (e.g., TeraTerm, PuTTY, or HyperTerminal).
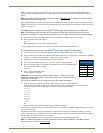
5. Select the COM port and set the settings to match the default ones in the HDMI UTPro
Serial Port Settings table to the right.
Click OK.
6. Apply power to the HDMI UTPro.
A short splash screen appears.
Important: As you enter each of the commands in Step 7, check to be sure all
destinations display stable video. If a destination (sink) does not support HDCP, its
display will turn solid red.
(If any of the commands fail, try routing the input to each output individually.)
7. Enter the following sequence of commands, which routes each source to all destinations.
(Each one-to-all command can take up to as much as a minute and a half to complete.* It is normal for the
remaining monitors to lose and then regain content as each new output is added.)
CI1O*T
CI2O*T
CI3O*T
CI4O*T
CI5O*T
CI6O*T
CI7O*T
CI8O*T
Or
Route each input to all runtime intended outputs with BCS commands.
As the process is completed, the keys for the destination devices are stored in the HDMI-UTPRO-0808 enclosure’s sink
key cache for the input.
The HDMI UTPro caches the keys and continuously sends them to the source (in a cumulative manner) even if the
source is only connected to a single output at a time. If that single input has been switched to more of the outputs than its
sink key cache will support, the source device will fail.
* Time for initial authentication can vary noticeably for different source and destination devices.
Note: For additional information on BCS commands, see the “Instruction Manual – BCS Basic Control
Structure Protocol” on the at www.amx.com.
HDMI UTPro
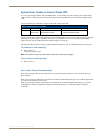
Serial Port Settings
Baud Rate 9600
Data Bits 8
Parity None
Stop Bits 1
Flow Control None


