


Installation and Setup
28
Instruction Manual – HDMI-UTPRO-0808
To install and set up an HDMI UTPro in a rack:
1.
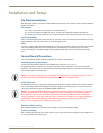
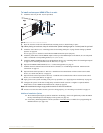
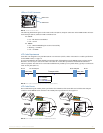
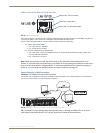
Attach the rack ears per FIG. 10 (ears provided).
2. Place the enclosure in the rack and attach front-mounting screws to hold it firmly in place.
Tip: When placing an enclosure, keep in mind that the optimal viewing angle for a control panel is eye level.
3. Attach the source devices; see “Attaching Cables for Switching/Transport” on page 29 and “Setting Up HDMI
Systems” on page 60.
Do not apply power to the devices until after the HDMI UTPro has power (Step 10).
4. Attach the patch cables from the HDMI outputs on the top to the HDMI inputs on the bottom; be sure each patch
cable is connected to corresponding numbers (1 to 1, 2 to 2, etc.).
5. Attach the HDMI-UTPRO-RX Receivers and destination devices see “Attaching Cables for Switching/Transport”
on page 29. For mounting information for the Receivers, see page 15.
6. Optional for HDMI-UTPRO-RX Receivers – Connect IR equipment; see page 32.
7. Establish network communication with a NetLinx Controller; see “Establishing an Ethernet 10/100 Network
Connection” on page 33.
8. Optional for the Serial port (RJ-12 / RS-232) – Establish serial communication with an external serial control
device; see “Serial Port (RJ-12)” on page 36.
9. Optional for the Control port (DB-9 / RS-232) – Establish serial communication with an external serial control
device; see “Control Port (DB-9)” on page 39.
10. Apply power to the system according to the power-up procedure; see “Applying Power and Startup” on page 40.
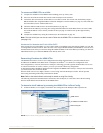
11. Configure the system via the Zero-Config utility in NetLinx Studio (Version 3 or higher is required) and the
WebConsole; see the “HDMI UTPro WebConsole” chapter on page 69.
Note: We recommend using a surge protector and/or an AC line conditioner.
12. Execute a test switch to make sure the system is working properly; see “Executing a Test Switch” on page 41.
Additional Installation Options
We recommend priming the system for InstaGate
®
Technology, which will significantly reduce the HDCP
latency and interruptions on all displays in the system (see page 66).
If necessary, EDID Programmer software (located at www.amx.com) is available for re-programming the
HDMI connectors (see page 101).
FIG. 10 Attach rack ears to sides of enclosure