


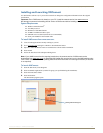

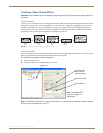


Appendix D – Creating Virtual Matrices
121
Instruction Manual – HDMI-UTPRO-0808
Preparing Existing VMs
We recommend preparing the configuration file for new VMs by making the following changes to the existing VMs.
Important: Before making these changes: use Save As (under the File menu), make a backup copy of the
current file with a new name, and save it to the PC.
Change the name of the current VM 0 to a large two digit number (e.g., 55). In the event that you decide to
reuse it later, the number can be changed again.
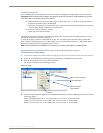
From the Virtual Matrix View, select the text in the Virtual Matrix field in the right-hand pane, edit in-place,
and press Enter. Repeat with the text in the Name field.
Delete VM 1 (this is a duplicate of VM 0).
Right click VM 1 and select Delete.
The following procedure assumes that XNConnect has already been used to discover the configuration file (.xcl). For
information on discovering a system, see page 112.
To create the example set of three virtual matrices on page 119, you would need to repeat the entire procedure three
times. The first time through creates a new virtual matrix, VM 1. The information in brackets [ ] indicates the changes
required on the subsequent times through for VM 2 and VM 3.
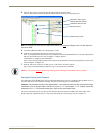
Note: The control panel on the HDMI UTPro supports a maximum of two digits for numbering VMs.
The information in the instructions that follow is based on the example at the bottom of page 119.
To create a new virtual matrix:
1.
Using Save As (under the File menu), make a backup copy of the current file with a new name and save it to the PC.
2. Follow the recommendations in “Preparing Existing VMs” above for handling the current VMs.
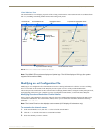
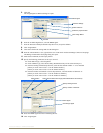
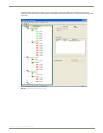
3. From the Virtual Matrix menu, select Add Virtual Matrix.
The Assign Virtual Matrix Signals dialog box opens.
4. Under the Supported System Signals list (use the Standard Basic tab), select the HDMI signal for the new VM and
click Assign Signal.
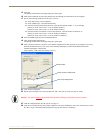
Under Virtual Matrix Info, enter “1” for Number and “VM 1 (in 1-6 out 1-8)” for the Name.
[When you create VM 2: enter “2” for Number and “VM 2 (in 7 out 1-4)” for the Name.]
[When you create VM 3: enter “3” for Number and “VM 3 (in 8 out 5-7)” for the Name.]
Enter a number and name
Check the signals
to be assigned
Click OK
Select the signal
Click Assign Signal