


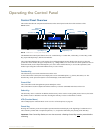


Operating the Control Panel
47
Instruction Manual – HDMI-UTPRO-0808
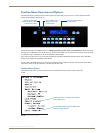
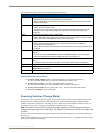
The Function menu and its submenus access the following modes and lists:
Working With the Function Menu
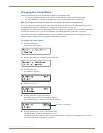
To choose a mode, submenu, or list – Press the Function Key to access the Function menu.
Use the Control Dial and Select Key to choose the desired mode, submenu, or list.
To select inputs or outputs – Press the corresponding Input or Output Key.
Selected keys will change color or flash, depending on the routing state (see page 45).
To select values for fields (such as a global preset value) – Use the Control Dial and Select Key.
To execute a command – Press the Take Key.
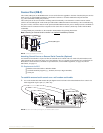
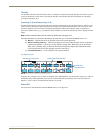
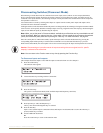
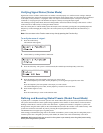
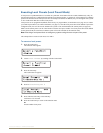
Executing Switches (Change Mode)
A switch is an active connection between an input (source) device and one or more output (destination) devices. The
signals routed in a switching operation are individual signals or groups of individual signals coming through the
connectors on the rear of an enclosure. Executing a preset is a quick way to execute multiple switches at a time. For
information on local presets, see page 54; for information on global presets, see page 51.
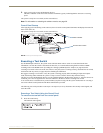
Note: The number of the virtual matrix (default VM 0) that operations are currently being executed on is
displayed in the upper-right corner of the display. The HDMI UTPro functions the same for its two VMs, VM 0
and VM 1.
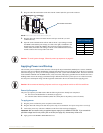
You can execute switches from the control panel using the steps on the following page or by executing a global preset
(see page 51).
When an Input or Output Key is pressed, the channel name displays on the LCD (e.g., O_Ch:0003 for Output 3). Hold
the key down to display the name longer.
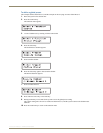
Function Menu
Change Selecting Change places the system in Change Mode.
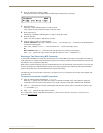
• The control panel must be in Change Mode to execute switches.
• While in Change Mode, select the Input and Output(s) Keys followed by the Take Key to execute
switches (see page 48).
Virtual Matrix Selecting Virtual Matrix accesses the VMs that are defined for the system.
• The list contains 0:All and 1:Video.
• The setting does not need to be changed as the system functions the same for either VM. The
exception is if you create VMs to manage control of sources with limited sink support (see
page 119).
Status Selecting Status places the system in Status Mode.
• While in Status Mode, signal status can be verified to confirm correct routing or routing to multiple
outputs without risk of accidentally executing a switch (see page 51).
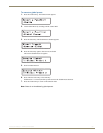
Disconnect Selecting Disconnect places the system in Disconnect Mode.
• While in Disconnect Mode, select the Input or Output Key(s) followed by the Take Key to
disconnect switches (see page 50).
• While in Disconnect Mode, the control panel does not indicate the current routing of selected inputs
or outputs.
Setup Options Selecting Setup Options accesses this submenu’s option for checking the Software Version (see
page 56).
• Two submenu options, Default VM (Virtual Matrix) and Reload Config, do not normally apply
unless the configuration file has been modified (see page 110 and page 119).
Lock Panel Selecting Lock Panel places the panel in Lock Mode at which time the password is entered to lock the
panel.
• Locking the control panel limits access which can prevent accidental switches (see page 55).
Adjust Audio This submenu and the options under Adjust Audio do not
apply to the HDMI UTPro.
Global Preset Selecting Global Preset accesses this submenu’s options Execute Global Presets and Define
Global Presets (see page 51).
Local Preset Selecting Local Preset accesses local presets that can be executed (see page 115).