


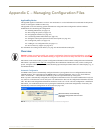


Appendix C – Managing Configuration Files
116
Instruction Manual – HDMI-UTPRO-0808
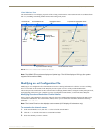
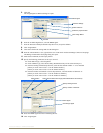
2. Click the Name New button.
The Name New Preset dialog box opens.
3. Optional – Enter a different preset number (local presets do not need to be numbered sequentially).
4. Enter a name for the new preset.
5. Click OK.
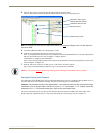
The Modify Preset dialog box opens.
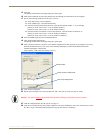
6. For the first switch, click the source channel (input) and one or more destination channels (outputs). Select multiple
destination channels by holding down the Control key while selecting the channels.
7. Click the Assign Switch button.
The input appears in the Assignment column of the Destination Channels list; the switch will execute when the
local preset is executed.
8. Disconnect inputs* or outputs as part of the local preset by selecting either the source or destination channel and
clicking the Disconnect button. The input or output appears in its corresponding Disconnected Channels list; the
input or output will be disconnected when the local preset is executed.
* Disconnecting an input will disconnect all outputs it is connected to.
9. Repeat Steps 6, 7, and 8 for all switches and/or disconnects to be included in the preset.
Note: For information on the other buttons and preset modifications, press F1 while the Manage Local
Presets dialog box is open.
10. After all switches for the preset have been assigned, click OK and then close the Modify Local Presets dialog box.
11. Define additional local presets by repeating the steps.
12. Load the .xcl configuration file onto the system (see the next page).
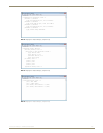
If the .xcl configuration file has been previously loaded to the system and local presets are the only modifications
that have been made to the .xcl file, select Configure \ Configure Special – Virtual Matrix \ Configure All VM
Local Presets.
If the .xcl file is being loaded for the first time (assumes an automatically constructed configuration is on the CPU),
select Configure \ Configure All.
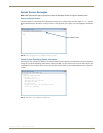
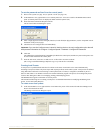
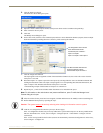
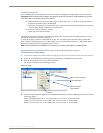
The Disconnected Channels box
shows that Output 2 will be
disconnected as part of Preset 1.
The Assignment column shows
three switches that will be
executed as part of Preset 1:
Input 2 to Output 1
Input 3 to Output 3 and Output 4
Caution: The system must not be actively switching when loading this information onto the system.