


88
• Extensive use of the programming,
learning and configuration functions of
the remote may consume significantly
more battery power than normal remote
operation. While the batteries should
last for four to six months in normal
operation, you may find that they need
to be changed sooner after the remote
is programmed for the first time.
• When the batteries approach a level
below which the remote will not func
-
tion, the remote’s LCD screen will dis-
play a
LOW BATTERY warning as
shown in Figure 118. We strongly rec-
ommend replacing the batteries as
soon as this message appears to avoid
the loss of programming and configura-
tion settings. These settings are
not
lost when the batteries are changed
quickly.
Figure 118
• The remote has a built-in backlight that
may be activated by pressing the
Light
Button
W
. This button is made from
a special “glow” material so that it is
easier to find in dark rooms. This glow
feature does not consume any electric-
ity, but the glow will fade when the
remote is kept in a dark location for an
extended period of time. The “glow”
feature may be restored by placing the
remote in normal room light for a few
hours.
• The remote’s backlight will remain lit
for approximately 5 seconds after the
Light Button
W
is pressed, and it
will stay lit for another 5 seconds if
any key is pressed while the backlight
is on. You may keep the backlight lit by
holding the Light button, but extensive
use of the backlight will reduce battery
life.
•
The LCD display will remain on for 10
seconds after a key is pressed and
then turn off to conserve battery life.
• When any button is held for more than
30 seconds, the LCD will turn off and
the remote will stop transmitting the
codes to conserve battery life.
Programmed Device Functions
Once the CVR700R2 remote has been
programmed for the codes of other
devices, press the appropriate
Input
Selector
345 to switch the
remote to control the audio section of the
CVR700 (
System Selector 5), the
CVPD50 screen (
Screen Selector 4),
the internal DVD/CD changer of the
CVR700 (
DVD Selector 3) or to con-
trol additional products. When you press
any one of the selectors, its name will
appear on the upper line of the
LCD
Information Display
2 to indicate
that you have changed the device being
controlled.
When operating a device other than the
CVR700 or CVPD50, the controls may not
correspond exactly to the function printed
on the remote or button. Some com-
mands, such as the volume control, are
the same as they are with the CVR700.
Other buttons will change their function
so that they correspond to a secondary
label on the remote. For example, the
Slow Play controls also function as the
Channel Up and Channel Down controls
when operating most TV sets, VCRs or
cable boxes. The Channel Up/Down
indication is printed directly on the
remote. For many standard CD players,
cassette decks, VCRs and DVD functions,
the standard function icons are printed
on top of the buttons. For some products,
however, the function of a particular but-
ton does not follow the command printed
on the remote. Even though the name of
the function will appear on the lower line
of the
LCD Information Display 2
when the button is pressed, in order to
conveniently see which function a button
controls before you press it, consult the
Function List tables on pages 89–91.
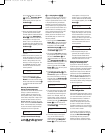
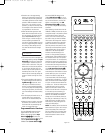
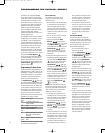
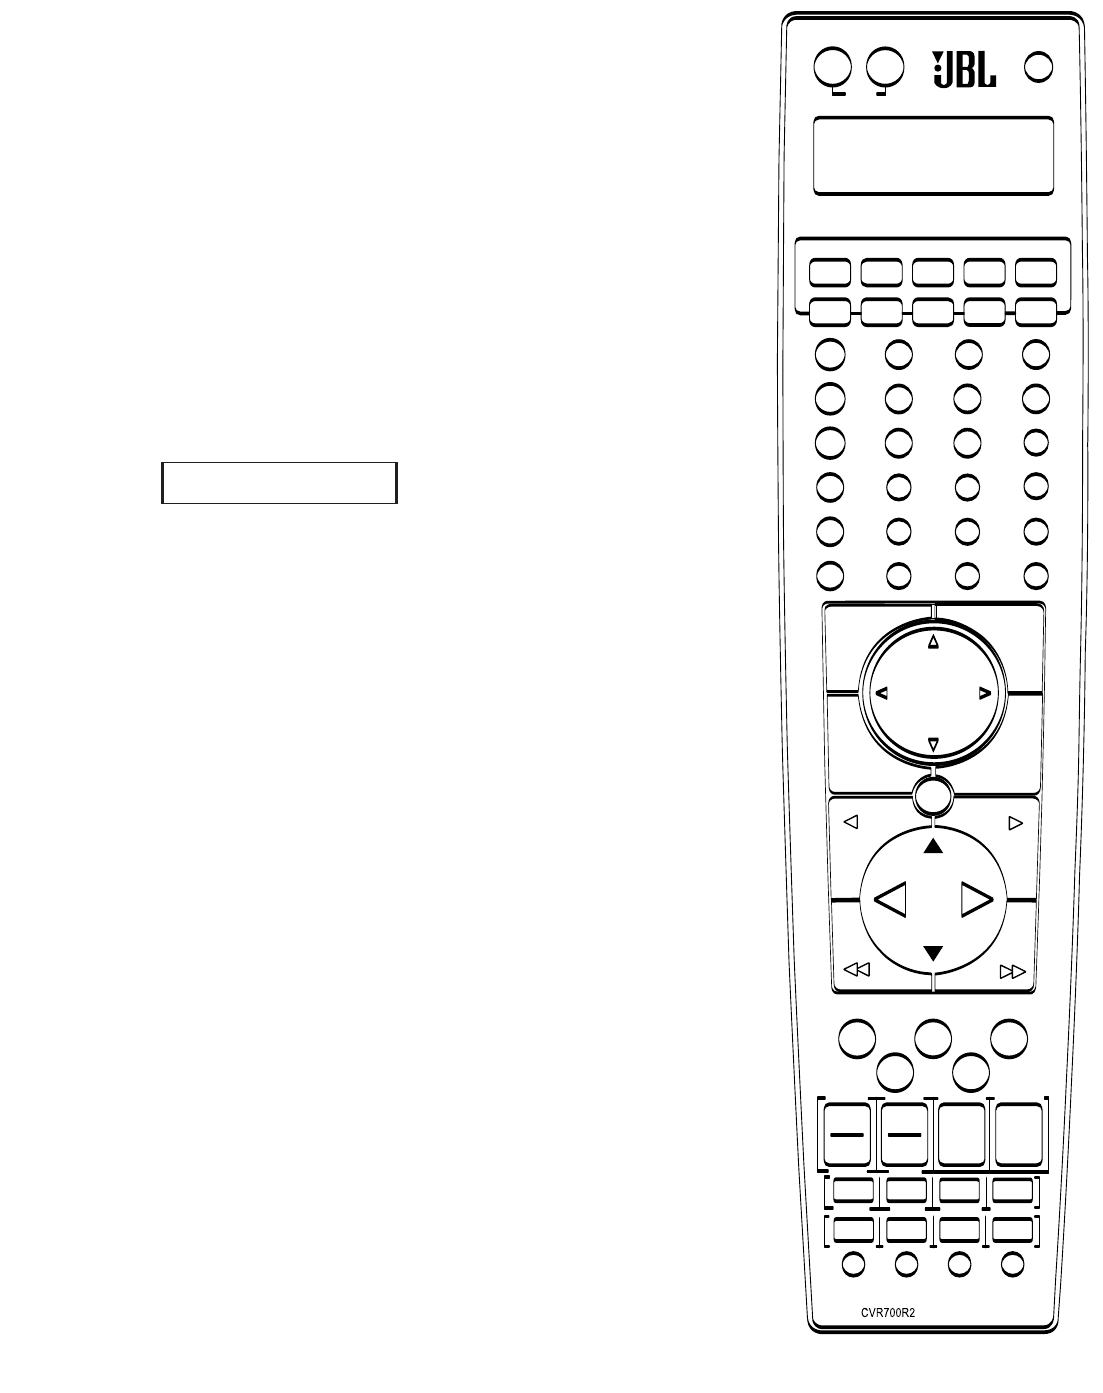
T
o use those tables, first check the type
of device being controlled (e.g., TV, VCR).
Next, look at the remote control diagram
in Figure 119. Note that each button has
a number on it. T
o find out what function
a particular button has for a specific
device, find the button number on the
Function List and then look in the column
for the device you are controlling. For
example, button number 37 is the Zoom
button for the CVR700’s internal DVD
changer, but it is the Memory button for
the tuner; the +100 button for many TVs,
VCRs, HDTV tuners and PVRs, and the
Enter button for many video game con-
soles and D-VHS players.
NOTE: The numbers used to describe the
button functions in Figure 119 for the pur-
poses of describing how a button oper
-
ates are a different set of numbers than
those used in the rest of this manual to
describe the button functions for the
main remote.
DVD/MAIN
L
OW BATTERY
1
4
9
5
10
6
11
7
12
8
13
14
18
22
26
30
34
38
39
43
45
48
52
50 51
42
41
40
44
47 49
53
54
55 56 57
59
64 65
60
61
66
70
67
71
68
72
69
73
77
767574
62
63
58
46
15
19
23
27
31
35
16
20
24
28
32
36
17
21
25
29
33
37
23
Figure 119
CVR700 OM 12/17/04 4:24 PM Page 88