


44
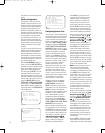
Cable/Satellite Analog S-Video Input
‹ in order to view the CVR700’s audio
on-screen menu system.
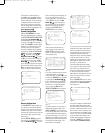
Digital Recorder Source Input
If you have a personal video recorder
(PVR), such as a TiVo, we recommend
that you connect it to the Digital Recorder
(DR) source input and output jacks.
Alternatively
, use the Digital Recorder
source for a DVD Recorder
, a CD recorder,
a MiniDisc recorder, a tape deck or any
other audio or A/V recording device.
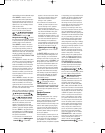
Select either the
Digital Recorder
Coaxial Digital Audio Input
f or the
Digital Recorder Optical Digital
Audio Input
j for your digital audio
connection (but not both), and connect
the appropriate digital audio output on
the recorder to the corresponding digital
audio input. If desired, connect the ana-
log audio outputs of the recorder to the
Digital Recorder Analog Inputs ª.
For PVRs and DVD recorders, connect the
component video outputs to the
Digital
Recorder Component Video Inputs
‡. Note that there are no corresponding
component video outputs, as copy-pro-
tection measures incorporated in most
devices prohibit recording component
video signals due to their high quality.
Alternatively, you may connect the com-
posite or S-video outputs of your recorder
to the Digital Recorder Analog S-Video
Input
ª, but note that a separate source
is available for analog VCRs.
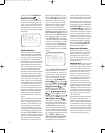
Connect either the
Coaxial Digital
Audio Output
b or the Optical Digital
Audio Output
g to the corresponding
record input on your recording device. If
you also connect the
Digital Recorder
Analog Audio Outputs
‚ to the analog
record inputs on your device, remember to
select the correct input on your recorder.
Connect either the composite video or S-
video
Digital Recorder Analog V
ideo
Output
‚ to the corresponding record
input on your recording device.
VCR Source Input
If you have an analog VCR or other ana
-
log recording device, we recommend that
you connect it to the VCR source input
and output jacks.
Connect the analog audio outputs of the
recorder to the
VCR Analog Audio
Inputs
⁄. If available, connect the S-
video output of your recorder to the
VCR
Analog V
ideo Input
⁄. Otherwise, use
the composite video jacks.
Next, connect the
VCR Analog Audio
Outputs
¤ to the analog audio record
inputs on your recorder. Connect the
same type of
VCR Analog Video Output
¤ (composite or S-video) that you used
for the input to the CVR700 to the record
input of your device.
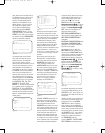
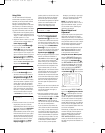
DVI/Computer Source Input
Due to its advanced video processing and
reproduction capabilities, the JBL Cinema
Vision system may be used with your per-
sonal computer (PC) for no-compromise
video displays. A dedicated DVI (digital
video interface) may be used with com
-
patible computers to enjoy activities from
video games to surfing the Internet. The
large screen is perfect for displaying pre-
sentations to a group, or simply for pro-
viding a better view of an intricate
spreadsheet. This source input may also
be used with the latest compatible DVD
players or other devices with high-quality
DVI video outputs.
Select either the
DVI/Computer Coaxial
Digital Audio Input
f or the DVI/
Computer Optical Digital Audio Input
k for connecting the corresponding digi-
tal audio output on your PC. Alternatively,
or as a backup, connect the analog audio
outputs on your PC to the
DVI/Computer
Analog Audio Inputs
¶. If your PC’s
analog audio output is a stereo 1/8-inch
mini-jack, you will need to supply a Y-
cable with a stereo 1/8-inch mini-plug
at one end and conventional left and
right analog audio interconnect plugs
at the other.
Connect the video output port on your
PC to the
DVI (HDCP)/Computer Video
Input
5.
If your computer has an analog VGA
video output instead of a DVI output, you
may use the included VGA-to-DVI adaptor
cable to connect the computer’
s video
output to the
DVI (HDCP)/Computer
Video Input
5.
NOTE: When using a source connected
via the
DVI (HDCP)/Computer Video
Input
,
it is not possible to view the
CVR700’s video on-screen menu system.
In addition, although you may access the
audio menus, if you attempt to do so, you
will temporarily lose the video signal at
the DVI input. If the last previous source
used provided an S-video signal, such as
an external VCR, then that signal will
appear
when you attempt to access the
on-screen
menus while using the
DVI/Computer source.
IMPORTANT: The Screen Saver function
does not operate when using the DVI
video input. Therefore, to prevent an
image from burning into your CVPD50
screen, it is extremely important that you
activate the Screen Saver function on
your PC or other DVI device. If none is
available, we recommend you place the
CVPD50 screen in Sleep mode by press-
ing the
Screen Standby/Sleep Button
Y on either remote when you
anticipate that a still image will remain
on screen for more than a few minutes.
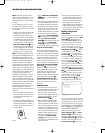
A/V Auxiliary Source Input
An auxiliary audio/video source input is
provided in case you have an additional
component you’d like to connect to your
JBL Cinema Vision system, such as an
additional cable television box, satellite
receiver, HDTV tuner, laserdisc player, or
any other audio/video device. Do not con-
nect a turntable to this input unless you
are using it with a phono preamp with
conventional analog audio outputs.
Connect the coaxial or optical digital
audio output of the device to the
Auxiliary Coaxial Digital Audio Input
c or the Auxiliary Optical Digital
Audio Input
h. As a backup, you may
wish to connect the device’s analog audio
outputs to the
Auxiliary Analog Audio
Inputs
•. If the device has composite or
S-video outputs, connect one or the other
to the corresponding
Auxiliary Analog
Video Input
•.
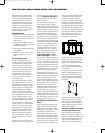
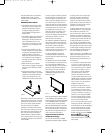
Main Room Remote Control
Extension
An infrared receiver located on the front
of the CVPD50 is capable of receiving
control commands for both the CVPD50
and the CVR700, enabling you to place
the CVR700 inside a cabinet. If you wish
to control an external source component
that is also hidden from view
, simply con
-
nect the CVR700’
s
Remote IR Output
Jack
fi to the Remote IR input jack on
compatible equipment. Now you may
simply point the remote control at the
plasma screen to send commands to any
device in your JBL Cinema Vision system.
If the CVR700 is used without the CVPD50
and is placed inside a cabinet or other
location that prevents the remote sensor
from receiving commands, an optional
remote IR sensor may be connected to the
Remote IR Input Jack fl.
33
3
4
3
5
3
6
3
7
3
8
3
9
4
0
4
1
42
43
44
45
46
47
48
49
50
51
52
53
54
55
56
57
3
8
39
4
0
4
1
3
1
32
30
2
8
29
2
5
26
2
7
2
8
29
3
0
2
4
23
2
2
2
1
20
3
1
37
3
6
3
5
34
3
3
3
2
31
37
3
6
3
5
34
3
3
32
4
8
49
5
0
5
1
47
4
6
4
5
44
4
3
42
1 2 3 4 5
6
7
8 9 1
0
1
1
1
2
1
3
1
4
1
5
1
6
1
7
1
8
1
9
2
0
2
1
2
2
2
3
2
4
2
5
2
6
2
7
2
8
2
9
3
0
3
1
3
2
3
3
3
4
3
5
3
6
3
7
3
8
3
9
4
0
4
1
4
2
43 44 45 46 47 48
33
34
35
36
37
38
39
40
41
42
43
44
45
46
47
48
49
50
51
52
53
54
55
56
57
38
39
40
41
31
32
30
28
29
25
26
27
28
29
30
24
23
22
21
20
31
37
36
35
34
33
32
31
37
36
35
34
33
32
48
49
50
51
47
46
45
44
43
42
1 2 3 4 5
6
7
8 9 10 11 12
13 14 15 16 17 18
19 20 21 22 23 24
25 26 27 28 29 30
31 32 33 34 35 36
37 38 39 40 41 42
43 44 45 46 47 48
CVR700 OM 12/17/04 4:24 PM Page 44