


57
adjust it so that a typical video picture
has about the same appearance as the
surroundings in the room. That way the
eye is relaxed when watching the TV pic-
ture. This setting may be reduced when
the surrounding light is dimmed, thereby
usually improving the sharpness signifi
-
cantly.
Sharpness: This temperature bar
and numerical value (ranging from 0 to 4)
reflect the sharpness of the picture. Due
to the pixel structure of video images,
lowering the sharpness setting will tend
to improve the quality of the picture.
Color: This temperature bar and
numerical value (ranging from 0 to 31)
reflect the saturation of the color.
Decreasing this setting to 0 will remove
all color and make the picture appear
monochrome (black and white). Increasing
it will brighten the intensity of the colors.
It may be adjusted using a blue filter and
color bars. If you do not have access to a
test pattern, you may adjust this setting
so that red objects are not too bright and
fuzzy around the edges.
DNC: This temperature bar and numeri-
cal value (ranging from 0 to 15) is used to
adjust dynamic noise control. Leave this
setting at its factory default, unless you
have a video image with interference that
is causing video “noise”. This setting may
be used to reduce the amount of noise
displayed.
The reset line may be used to reset all of
the settings in this menu for the current
video input.
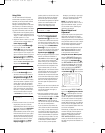
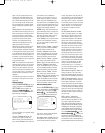
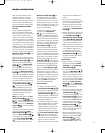
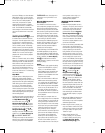
Display Settings
With the SCREEN MENU (Fig. 33) on
screen, scroll down to the
DISPLAY
SETTINGS
line and select it by
pressing the
Set Button s . The
DISPLAY
SETTINGS
submenu
(Figure 38) will be displayed.
Figure 38
This menu enables you to precisely adjust
the color display.
Color
Temperature
: This
setting has four options: Ideal, Cold,
Warm and User. The factory default set-
ting is named
Ideal, and is what we
recommend for most installations.
However, you may prefer the colors to
appear more blue overall, or more red
overall. Select the
Cold setting for
more blue content, or the
Warm setting
for more red content. Alternatively, if you
prefer to adjust the degree of red, green
and blue more precisely, select the
USER setting, which will activate user
color temperature settings for each color.
Picture
Contrast:
This set
-
ting has three options: Ideal, Light and
Dark. The factory default setting is
named
Ideal, and is what we recom-
mend for most installations. However
,
you may prefer images to appear either
lighter or darker.
User Color Temp. red: This
setting is only active when the
User
settings has been selected at the
Color Temperature line
above. The temperature bar and numeri-
cal value (ranging between 0 and 255)
reflect the intensity of the red pixels.
User Color Temp. green:
This setting is only active when the
User settings has been selected at the
Color Temperature line
above. The temperature bar and numeri-
cal value (ranging between 0 and 255)
reflect the intensity of the green pixels.
User Color Temp. blue:
This setting is only active when the
User settings has been selected at the
Color Temperature line
above. The temperature bar and numeri
-
cal value (ranging between 0 and 255)
reflect the intensity of the blue pixels.
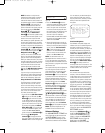
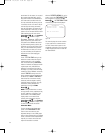
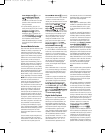
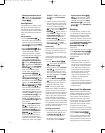
Advanced Settings Menu
With the SCREEN
MENU
(Fig. 33) on
screen, scroll down to the ADVANCED
line and select it by pressing the Set
Button
s . The ADVANCED
submenu (Figure 39) will be displayed.
Figure 39
This menu is used to adjust the appear-
ance of the on-screen menus.
Screen
menu
time
out
: This
setting allows you to adjust the amount
of time the Screen menus remain on
screen, with options of 20, 40 or 60 sec-
onds available. It is particularly important
with plasma displays to avoid leaving a
still image, such as a menu, on screen for
an extended period of time, as the image
may be “burned” into the screen perma-
nently
. Therefore, it is not possible to
set the menus to remain on screen
indefinitely.
On Screen Status time
out
: This setting allows you to adjust
the amount of time the various system
status banners remain on screen, or to
disable them altogether. These banners
appear when a source is selected and a
new audio or video signal is detected.
The aspect ratio banner will first display
the aspect ratio of the source, and then
the aspect ratio in which it will be dis-
played, depending on how you have con-
figured the system. The source banner
will display the name of the source, the
audio input, and the video input or other
information as appropriate. This setting
does not affect the status bar displayed
by the CVR700’s internal DVD/CD changer
when a disc is being played. You may
choose to remove the status banners
from view after 2, 3, 4, or 5 seconds, or
you may choose the Off setting, in which
they are not displayed at all.
Show Startup Screen: This
setting may be set to On or Off, and it
determines whether the JBL logo screen
appears when the CVPD50 is powered up.
OSD
Transparency
: This tem
-
perature bar reflects whether the Screen
menus appear transparent, so that the
current video image may be seen behind
them (dark square to the left), or opaque,
so that they have a black background that
blocks any view of the video image (dark
square to the right). There is a reset line
that may be used to reset the settings in
this menu only
.
DVD auto picture
resize
: JBL recommends that you
leave this setting in the default “On” posi-
tion so that images (video and still) on
DVDs, VCDs and JPEG discs will be auto
-
matically resized by the CVR700 to fill the
CVPD50 screen. This setting only applies
to the CVR700’
s internal disc changer; for
external video sources, you will still need
to use the
Frame Button ` or the
Letterbox Button z to select a dis
-
play mode for each source that fills the
screen. Also, note that some DVDs include
a letterboxed version in which black bars
above and below the picture are part of the
33
34
35
36
37
38
39
40
41
42
43
44
45
46
47
48
49
50
51
52
53
54
55
56
57
38
39
40
41
31
32
30
28
29
25
26
27
28
29
30
24
23
22
21
20
31
37
36
35
34
33
32
31
37
36
35
34
33
32
48
49
50
51
47
46
45
44
43
42
1 2 3 4 5
6
7
8 9 10 11 12
13 14 15 16 17 18
19 20 21 22 23 24
25 26 27 28 29 30
31 32 33 34 35 36
37 38 39 40 41 42
43 44 45 46 47 48
33
34
35
36
37
38
39
40
41
42
43
44
45
46
47
48
49
50
51
52
53
54
55
56
57
38
39
40
41
31
32
30
28
29
25
26
27
28
29
30
24
23
22
21
20
31
37
36
35
34
33
32
31
37
36
35
34
33
32
48
49
50
51
47
46
45
44
43
42
1 2 3 4 5
6
7
8 9 10 11 12
13 14 15 16 17 18
19 20 21 22 23 24
25 26 27 28 29 30
31 32 33 34 35 36
37 38 39 40 41 42
43 44 45 46 47 48
ADVANCED
Screen menu time out
On Screen Status
Show startup screen
OSD Transparency
DVD auto picture resize
Screen status LED
4:3 scaling
Reset all
Back to screen menu
20s
3s t/0
Yes
On
On
Non-Linear
33
34
35
36
37
38
39
40
41
42
43
44
45
46
47
48
49
50
51
52
53
54
55
56
57
38
39
40
41
31
32
30
28
29
25
26
27
28
29
30
24
23
22
21
20
31
37
36
35
34
33
32
31
37
36
35
34
33
32
48
49
50
51
47
46
45
44
43
42
1 2 3 4 5
6
7
8 9 10 11 12
13 14 15 16 17 18
19 20 21 22 23 24
25 26 27 28 29 30
31 32 33 34 35 36
37 38 39 40 41 42
43 44 45 46 47 48
DISPLAY SETTINGS
Color Temperature Ideal
Picture Contrast Ideal
User color temp. red 128
User color temp. green 127
User color temp. blue 113
Back to screen menu
33
34
35
36
37
38
39
40
41
42
43
44
45
46
47
48
49
50
51
52
53
54
55
56
57
38
39
40
41
31
32
30
28
29
25
26
27
28
29
30
24
23
22
21
20
31
37
36
35
34
33
32
31
37
36
35
34
33
32
48
49
50
51
47
46
45
44
43
42
1 2 3 4 5
6
7
8 9 10 11 12
13 14 15 16 17 18
19 20 21 22 23 24
25 26 27 28 29 30
31 32 33 34 35 36
37 38 39 40 41 42
43 44 45 46 47 48
CVR700 OM 12/17/04 4:24 PM Page 57