


45
NOTE: All remotely controlled compo-
nents must be linked together in a “daisy
chain.” Connect the IR OUT jack of one
unit to the IR IN of the next to establish
this chain.
You are now ready to power up the sys-
tem, make minor configuration settings,
and then begin enjoying your JBL Cinema
Vision system.
1. Plug the AC power cords for the CVPD50,
CVR700 and any source devices into
unswitched AC outlets. Make sure the
master power switch on the underside of
the CVPD50 (next to the power cord jack)
is in the “1” position. Use a small mirror
to locate the switch. The LED inside the
Main Power On/Off Switch 1 on the
CVR700 will turn red, indicating that the
unit is in Standby mode. The LED on the
front of the CVPD50 will turn amber, indi-
cating that it, too, is in Standby mode.
NOTE: It is possible to see the LED on the
front panel of the CVPD50 flashing red and
yellow alternately even though you have
unplugged the CVPD50’s power cord. This is
because the CVPD50 also receives power
through its connection to the CVR700 in
order to trigger turn-on when the CVR700
is
powered on for seamless operation;
this is
normal. However, the CVPD50’s power cord
must be plugged in for proper operation; the
LED will flash when the CVR700 is turned
on to alert you that the power cord is
unplugged. If the CVPD50 does not turn on
when the CVR700 is powered up and the
LED on the CVPD50 is not flashing red and
yellow, then turn off both units, unplug them
both from AC power, unplug the JBL Digital
Link cable that connects them and then
reconnect everything. If this does not resyn-
chronize the components, contact your
authorized JBL custom installer or dealer for
assistance.
2.
Remove the protective plastic film from
the front-panel lens. If left in place, the
film will affect the performance of your
remote control.
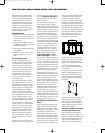
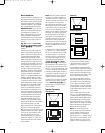
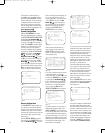
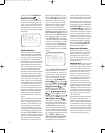
3.
Install the four supplied AAA batteries in
the main remote as shown in Figure 5. Be
certain to follow the (+) and (–) polarity
indicators that are on the top of the bat-
tery compartment.
Figure 5
4. Press the Main Power On/Off Switch
1b to turn on the CVR700 and
the CVPD50.
5. The remote control contains several pre-
programmed special functions that may
be activated by pressing and holding par-
ticular buttons rather than pressing and
releasing. One such function is the “All
On/Off” power function. To turn on the
CVR700, CVPD50 display screen, and other
devices programmed into the remote,
press and hold the
Power All On Button
b until all units turn on. The LED inside
the CVR700’s
Main Power On/Off
Button
1 will turn orange to confirm that
t
he unit is on, and the
Information
Display Ô will also light. The CVPD50
will turn on and display the JBL logo screen.
Using the On-Screen Display
When making the following adjustments,
you may find it easier to use the on-screen
display system. These easy-to-read displays
give you a clear picture of the current status
of the unit and make it easy to see which
selection you are making. To view the on-
screen menus, make certain that you have
made a connection to the CVPD50 from the
Output to JBL Cinema Vision CVPD50
Screen Port
on the rear panel of the
CVR700. The CVR700’s on-screen menus
are not available when a component video
source device is in use unless the corre-
sponding S-video connection has been
made to the CVR700. The on-screen menus
are not available at all when the
DVI
(HDCP)/
Computer V
ideo Input
is
in use. If you attempt to use the on-screen
menus, the DVI video input will be tem-
porarily lost.
IMPORT
ANT NOTES:
•
In order to access the on-screen menus
for the CVR700’s audio section, make sure
the remote control is in System mode
(NOT set to control an external source
device or even the CVPD50 screen). To set
the remote to System mode, press the
System Selector j .
•
Both the CVPD50 and CVR700 contain
separate IR sensors that are capable of
receiving commands from either remote
control. JBL recommends that you point
the remote at the CVPD50 screen for all
commands, as the JBL Digital Link cable
is able to pass remote commands to the
CVR700 for system and DVD control, as
well as to any other devices you have
connected to the
Remote IR Output
Jack
fi. However, video control com-
mands received by the CVR700 cannot be
passed to the screen.
• When viewing the on-screen menus, it
is important that they not be left on the
screen for an extended period of time.
The constant display of a static image
such as these menus or video game
images is likely to cause the image to be
permanently “burned into” the plasma
screen. This type of damage is not covered
by the JBL Cinema Vision warranty.
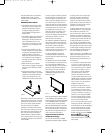
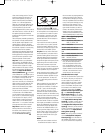
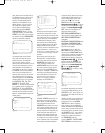
Making Configuration
Adjustments
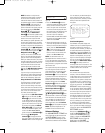
The on-screen menu system for the audio
section is available by pressing the
OSD
Button
n . When this button is
pressed, the
MAIN MENU (Figure 6)
will appear
, and adjustments are made
from the individual menus. To use the
on-screen menu system in the audio
section of the CVR700, press the
⁄/¤
Navigation Controls q until the
on-screen
› cursor is next to the item
you wish to adjust, and then press the
Set Button s to select that item.
In some cases, the selection will cause a
new submenu to appear, and when the
lowest level submenu has been reached,
pressing the
Set Button s will
select the item that the on-screen
› cur-
sor is pointing to. Some settings in the
ADVANCED submenu will require you
to press the.
‹/› Navigation Controls
q to scroll through the available
settings. Throughout this manual, when
you are asked to “scroll” to a certain
item, that means to use the
⁄/¤
Navigation Controls q until the
on-screen
› cursor is next to the item.
Figure 6
The menus will remain on the screen for
20 seconds, and then they will “time-out”
and disappear from the screen. The time-
out may be increased to as much as 50
seconds by going to the
ADVANCED
SETTINGS
menu, and changing the
item titled
OSD TIME OUT.
Selections will also be shown in the
Upper Display Line H or the Lower
Display Line
E, depending on which
parameter is being adjusted. In general,
the
Upper Display Line H will indicate
the name of the current menu and the
Lower Display Line E, will indicate
** MAIN MENU **
SYSTEM CONFIGURATION
SOURCES
SPEAKERS
ADVANCED
LIP SYNC
›
›
33
34
35
36
37
38
39
40
41
42
43
44
45
46
47
48
49
50
51
52
53
54
55
56
57
38
39
40
41
31
32
30
28
29
25
2
6
27
28
29
30
24
23
22
21
20
31
3
7
36
35
34
33
32
31
37
36
35
34
33
32
48
49
50
51
47
46
45
44
43
42
1 2 3 4 5
6
7
8 9 10 11 12
13 14 15 16 17 18
19 20 21 22 23 24
25 26 27 28 29 30
31 32 33 34 35 36
37 38 39 40 41 42
43 44 45 46 47 48
33
34
3
5
36
3
7
38
3
9
40
4
1
42
4
3
44
4
5
46
4
7
48
4
9
50
5
1
52
5
3
54
5
5
56
5
7
38
39
40
41
31
32
30
28
29
2
5
26
27
28
2
9
30
2
4
23
22
21
20
31
37
36
35
3
4
33
32
3
1
3
7
36
3
5
34
33
32
48
49
50
51
4
7
46
4
5
44
43
42
1 2 3 4 5
6
7
8 9 10 11 12
13 14 15 16 17 18
1
9
2
0
2
1
2
2
2
3
2
4
25 26 27 28 29 30
31 32 33 34 35 36
37 38 39 40 41 42
43 44 45 46 47 48
33
3
4
3
5
3
6
3
7
3
8
3
9
4
0
4
1
42
43
44
45
46
47
48
49
50
51
52
53
54
55
56
57
38
39
4
0
4
1
3
1
32
30
2
8
29
25
26
2
7
28
29
3
0
24
23
2
2
21
20
3
1
37
3
6
35
34
3
3
3
2
31
37
3
6
35
34
3
3
32
48
49
5
0
5
1
47
4
6
45
44
4
3
42
1 2 3 4 5
6
7
8 9 1
0
1
1
1
2
1
3
1
4
1
5
1
6
1
7
1
8
19 20 21 22 23 24
25 26 27 28 29 30
3
1
3
2
3
3
3
4
3
5
3
6
37 38 39 40 41 42
4
3
4
4
4
5
4
6
4
7
4
8
33
3
4
3
5
3
6
3
7
3
8
3
9
4
0
4
1
42
43
44
45
46
47
48
49
50
51
52
53
54
55
56
57
38
39
4
0
4
1
3
1
32
30
2
8
29
2
5
26
2
7
28
29
3
0
2
4
23
2
2
21
20
3
1
37
3
6
35
34
3
3
3
2
31
37
3
6
3
5
34
3
3
32
48
49
5
0
5
1
47
4
6
4
5
44
4
3
42
1 2 3 4 5
6
7
8 9 10 11 12
13 14 15 16 17 18
1
9
2
0
2
1
2
2
2
3
2
4
2
5
2
6
2
7
2
8
2
9
3
0
31 32 33 34 35 36
37 38 39 40 41 42
43 44 45 46 47 48
3
3
34
35
36
37
38
39
40
41
4
2
4
3
4
4
4
5
4
6
4
7
4
8
4
9
5
0
5
1
5
2
5
3
5
4
5
5
5
6
5
7
3
8
3
9
40
41
31
3
2
3
0
28
2
9
2
5
26
27
28
2
9
30
2
4
2
3
22
21
2
0
31
37
36
35
3
4
33
32
3
1
37
36
3
5
3
4
33
32
4
8
4
9
50
51
47
46
4
5
4
4
43
42
1 2 3 4 5
6
7
8 9 10 11 12
13 14 15 16 17 18
1
9
2
0
2
1
2
2
2
3
2
4
2
5
2
6
2
7
2
8
2
9
3
0
31 32 33 34 35 36
3
7
3
8
3
9
4
0
4
1
4
2
43 44 45 46 47 48
3
3
34
35
36
37
38
39
40
41
4
2
4
3
4
4
4
5
4
6
4
7
4
8
4
9
5
0
5
1
5
2
5
3
5
4
5
5
5
6
5
7
38
3
9
40
41
31
3
2
3
0
28
2
9
25
2
6
27
28
2
9
30
24
2
3
22
21
2
0
31
3
7
36
35
3
4
33
32
3
1
3
7
36
35
3
4
33
3
2
48
4
9
50
51
4
7
46
45
4
4
43
4
2
1 2 3 4 5
6
7
8 9 1
0
1
1
1
2
13 14 15 16 17 18
19 20 21 22 23 24
2
5
2
6
2
7
2
8
2
9
3
0
3
1
3
2
3
3
3
4
3
5
3
6
37 38 39 40 41 42
4
3
4
4
4
5
4
6
4
7
4
8
33
34
35
36
37
38
39
40
41
42
43
44
45
46
47
48
49
50
51
52
53
54
55
56
57
38
39
40
41
31
32
30
28
29
25
26
27
28
29
30
24
23
22
21
20
31
37
36
35
34
33
32
31
37
36
35
34
33
32
48
49
50
51
47
46
45
44
43
42
1 2 3 4 5
6
7
8 9 10 11 12
13 14 15 16 17 18
19 20 21 22 23 24
25 26 27 28 29 30
31 32 33 34 35 36
37 38 39 40 41 42
43 44 45 46 47 48
33
34
35
36
37
38
39
40
41
42
43
44
45
46
47
48
49
50
51
52
53
54
55
56
57
38
39
40
41
31
32
30
28
29
25
26
27
28
29
30
24
23
22
21
20
31
37
36
35
34
33
32
31
37
36
35
34
33
32
48
49
50
51
47
46
45
44
43
42
1 2 3 4 5
6
7
8 9 10 11 12
13 14 15 16 17 18
19 20 21 22 23 24
25 26 27 28 29 30
31 32 33 34 35 36
37 38 39 40 41 42
43 44 45 46 47 48
3
3
34
35
36
37
38
39
40
41
4
2
43
4
4
45
4
6
47
4
8
49
5
0
51
5
2
53
5
4
55
5
6
57
3
8
3
9
40
41
31
3
2
3
0
28
2
9
2
5
26
27
2
8
29
30
2
4
23
2
2
2
1
2
0
31
37
36
3
5
34
33
32
31
37
3
6
3
5
3
4
33
32
4
8
4
9
50
51
47
4
6
4
5
4
4
43
42
1 2 3 4 5
6
7
8 9 1
0
1
1
1
2
1
3
1
4
1
5
1
6
1
7
1
8
19 20 21 22 23 24
2
5
2
6
2
7
2
8
2
9
3
0
3
1
3
2
3
3
3
4
3
5
3
6
3
7
3
8
3
9
4
0
4
1
4
2
4
3
4
4
4
5
4
6
4
7
4
8
SY
STEM CONFIGURATION
CVR700 OM 12/17/04 4:24 PM Page 45