18
SOURCE line to adjust it). Scroll down
to the
VIDEO INPUT line and
select it to configure the CVR700 to use
the video input you connected your
device to.
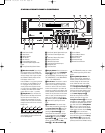
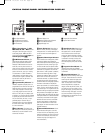
% Headphones Jack: This jack may
be used to listen to the CVR700's output
through a pair of headphones. Be certain
that the headphones have a standard
1/4" stereo phone plug, or that you use
an adapter, as needed, to convert the
plug on your headphones to the 1/4" jack
used on the CVR700. When the head
-
phone jack is in use, the main room
speakers will automatically be turned off
and the unit will output a standard stereo
signal. For more information on head-
phone listening, see page 60.
^ Front-Panel Door: The door may
be closed to hide the front-panel jacks
when they are not in use for a smoother
appearance. To open the door, gently
push on the bottom of the door in the
center to swing it down towards you, or
gently pull on the upper right corner. Push
upward on it to close.
& Source Selector: Rotate this knob
to scroll through the available input
sources. Turn the knob slowly and gently,
and you will feel a soft click as each
source is engaged. You may also hear a
click as the CVR700’s electrical circuits
engage the source. This is normal, and
assures you that you have correctly
selected the source. The name of the
source will be displayed in the
Upper
Display Line
H, and in a Status Banner
on screen, together with the source’s
audio input (for external sources) and
video format.
* Surround Mode Selector: Press
this button repeatedly to scroll through
the available surround modes. The modes
available will depend on the number of
speakers in the system and whether the
input is analog or digital. See page 60 for
more information on surround modes.
NOTE: 6.1 and 7.1 digital modes are
available only when the appropriate digi-
tal bitstream is present.
( Input Select Button: After you have
selected the desired input source, press
this button repeatedly to scroll through
the analog, optical digital and coaxial
digital audio inputs available for that
source.
Ó Volume Control: Turn this knob
clockwise to increase the volume, coun-
terclockwise to decrease the volume. If
the CVR700 is muted, adjusting the vol-
ume control will automatically release
the unit from the silenced condition.
Ô Information Display: This display
delivers messages and status information
to help you operate the CVR700. See
page 19 for a complete explanation of
the display.
Remote Sensor Window: The sen-
sor behind this window receives infrared
signals from the remote control that are
intended to control the non-video func-
tions of the CVR700 only. Aim the remote
at this area and do not block or cover
it unless an external remote sensor is
installed. Note that unless the CVR700
is not being used with the CVPD50, it is
best to aim the remote at the LED light
on the front of the CVPD50 plasma dis-
play, as the IR receiver located there can
accept remote control signals intended
for both the plasma display and the
CVR700.
CVR700 OM 12/17/04 4:23 PM Page 18


