


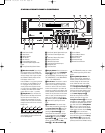
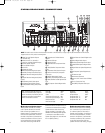

17
See page 64 for information on storing
preset stations.
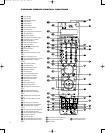
When the disc changer is the source,
press this button to open or close the
Disc Drawer 4. The Lower Display
Line
E will prompt you to press a disc
number. Press the
Disc Selector 5 cor-
responding to the number of the drawer
you wish to access.
7 Front-Panel Optical Digital Audio
Output:
Connect the optical digital input
of an audio or video product to this jack.
8 T
uning/Preset/Skip/Search
Buttons:
The function of these buttons
varies depending on whether you have
selected the tuner or the disc changer as
the current input source, and in what con
-
text you press it.
When the tuner is the source, press the
left button to tune lower-frequency sta-
tions and the right button to tune higher-
frequency stations. Each tap of the but-
tons will increase or decrease the fre-
quency by one increment. Press and hold
the button, and the tuner will scan for a
station with acceptable signal strength.
When the next higher or lower frequency
station with a strong-enough signal is
tuned, the frequency scan will pause.
Press the button again to stop scanning.
When the tuner is the source and you
have pressed the Tuning Mode Button
6 so that PRESET appears in the
Lower Display Line E, pressing these
buttons enables you to scroll through the
list of stations that have been previously
stored in the CVR700’
s memory
.
See page 64 for more information on
using the tuner
.
When the disc changer is the source,
press and release these buttons to move
(skip) either backward (left button) or for
-
ward (right button) through the tracks on
a DVD-Audio, CD or VCD disc or the
chapters on a DVD-Video disc. Press and
hold either button for at least 1 second
and then release to search either back-
ward (left button) or forward (right but-
ton) the current track or chapter at 2x
speed. Press and hold again and release
to increase the scan speed to 4x. Repeat
this procedure while in scan mode to
cycle through these scan speeds: 2x, 4x,
16x, 100x, 2x and so forth. Press and
release the button while scanning to skip
tracks or chapters. To stop searching, you
must press the
Play Button !, the
Pause Button @, the Stop Button #
or the other Search Button 8.
9 Front-Panel Optical Digital Audio
Input:
Connect the optical digital output
of an audio or video product to this jack.
) Front-Panel Coaxial Digital Audio
Input:
Connect the coaxial digital output
of an audio or video product to this jack.
! Tuner Band Selector/Play Button:
The function of this button varies depend-
ing on whether you have selected the
tuner or the disc changer as the source.
When the tuner is the source, pressing
this button will switch between the AM
and FM frequency bands. (See page 64
for more information on the tuner.)
When the disc changer is the source,
pressing this button will prompt you to
enter the number of the disc you wish
to play (corresponding to the drawer in
which the disc is loaded). You may select
a disc either by pressing one of the
Disc
Selectors
5 numbered 1 through 5, or
by pressing the
Numeric Keys l
numbered 1 through 5 on either remote
control. If you don’t select a disc number
within 5 seconds, the CVR700 will play
the last disc that was selected. If the disc
is an MP3 or WMA disc, each press of
this button will expand the current folder
until a file is located, and the final press
will begin play of that file. If no disc is
found, the
STOP MODE, DISC 1
message will appear and you will need to
open the drawer to insert a disc.
@ Memory/Pause Button: The func-
tion of this button varies depending on
whether you have selected the tuner or
the disc changer as the input source.
When the tuner is the source, press this
button to store the currently tuned station
as a preset. Two flashing underlines will
appear in the
Upper Display Line H.
Press the
Tuning Mode Button 6
until PRESET appears in the Lower
Display Line
E to indicate the function
of the
Tuning/Preset Buttons 8, then
press either of the
Preset Buttons 8
until the desired preset location appears
in place of the flashing underlines. Press
the
Memory Button @ again to store
the station in the preset location displayed.
When the disc changer is the source,
pressing this button during playback
freezes a picture (for DVD and VCD discs)
and pauses the playback signal. Pressing
the
Pause Button @ twice places the
DVD changer in the Step Forward mode,
in which each subsequent press of the
Pause Button @ advances the picture
one step or frame. Press the
Play or
Stop Button !# to exit the Step
Forward mode.
# FM Mode/Stop Button: The func-
tion of this button varies depending on
whether you have selected the tuner or
the disc changer as the input source.
When the tuner is the source, press this
button to switch between Stereo and
Mono modes for FM radio reception.
When weak reception is encountered,
select the Mono tuning mode. Press
again to switch back to Stereo mode.
See page 64 for more information.
When the disc changer is the source,
press this button once to stop playback
of the current disc and enter Resume
mode. In Resume mode, the CVR700 will
“remember” the point on the disc where
play was stopped, and the next time the
disc is played, it will commence playback
from this point, unless the unit was
turned off, another disc was selected or
another source was selected. To fully
stop the disc, press this button twice.
There may be a 1- or 2-second delay
before Stop mode takes effect. Resume
mode is not available for CDs, VCDs, MP3
discs or WMA discs. If one of those disc
types is playing, a single press of this
button will place the disc in Stop mode,
as indicated by the solid square and the
word
STOP appearing in the Upper
Display Line
H.
$ Front-Panel Audio/V
ideo Inputs:
The front-panel inputs give you the flexi-
bility to temporarily connect a device to
the CVR700. This capability is useful for
such applications as viewing home
movies directly from the camcorder
, or
playing a video game. For video devices,
connect one of the composite video, S-
video or component video outputs of the
device to the corresponding front-panel
input, and connect the left and right
audio outputs to the analog audio inputs.
Do not make more than one type of video
connection. In addition to the analog
audio connection, you may also connect
an optical or coaxial digital audio output
from the device to the CVR700. You will
then need to press the
Input Select
Button
( to select the desired audio
input (analog, optical or coaxial), and
specify the correct video input using the
audio on-screen menu system. Press the
System Selector f, and then the
OSD Button n to enter the menu sys
-
tem. Select the
SOURCES submenu,
and make sure the
GAME/CAMERA
source is selected (or select the
33
34
35
36
37
38
39
40
41
42
43
44
45
46
47
48
49
50
51
52
53
54
55
56
57
38
39
40
41
3
1
32
30
2
8
2
9
2
5
2
6
27
2
8
29
3
0
24
2
3
22
2
1
2
0
31
3
7
36
3
5
34
3
3
32
31
37
36
3
5
3
4
33
3
2
48
49
50
51
47
46
4
5
4
4
43
4
2
1 2 3 4 5
6
7
8 9 10 11 12
1
3
1
4
1
5
1
6
1
7
1
8
19 20 21 22 23 24
25 26 27 28 29 30
31 32 33 34 35 36
37 38 39 40 41 42
43 44 45 46 47 48
CVR700 OM 12/17/04 4:23 PM Page 17