80
5 In “Sample Select,” select the sample that you
wish to record. For this example, select ----: ---No
Assign----.
Immediately after the power is turned on, this will
be set to ----: ---No Assign----. You may sample even
in this condition. The sample will be automatically
recorded to a vacant sample number.
If you wish to first specify a sample number to
which the sample will be recorded, use the numeric
keys [0]–[9] and [ENTER] key or the popup menu to
select the number.
A sample will be created automatically when you
record.
A sample name such as 0000: NewSample_0000
will be assigned automatically. This name can be
edited using the “Rename Sample” page menu com-
mand.
If you execute sampling when an existing sample
such as 0000: NewSample_0000 is selected, the new
sample will be sampled to a vacant sample number.
You do not need to be concerned with this setting
even when you continue recording successive sam-
ples.
6 Select the “Sample Mode.”
Monaural source: If the “Audio Input (SAM-
PLING)” setting “Pan” is L000, set “Sample Mode”
to L-Mono. If “Pan” is R127, set “Sample Mode” to
R-Mono.
Stereo source: Set the “Sample Mode” to Stereo.
7 Press the [REC/WRITE] key.
If an input signal is present, the Recording Level
[dB] meter will move according to the Pan setting in
“Audio Input (SAMPLING).” This is the recording-
standby condition.
In the case of “Connections and settings for a mon-
aural source,” the L meter will move. In the case of
“Connections and settings for a stereo source,” the L
and R meters will move.
Use the “Recording Level [dB]” slider to adjust the
level. For this example, set the slider to the 0.0 set-
ting (
☞p.82 in the Parameter Guide).
8 At the moment that you wish to begin sampling,
press the [START/STOP] key.
Sampling will begin.
9 Sampling will stop when you press the [START/
STOP] key once again.
Sampling will stop automatically when the
remaining amount of memory reaches zero.
0 Play the C2 note on the keyboard.
The sample you recorded will play back.
If you wish to continue recording samples, repeat
steps 6–9.
Auto sampling
There are two ways to record a sample: manual and
auto.
With auto, sampling will begin when the input signal
exceeds the specified threshold level. For details on
manual sampling, refer to “Manual sampling” (
☞p.79).
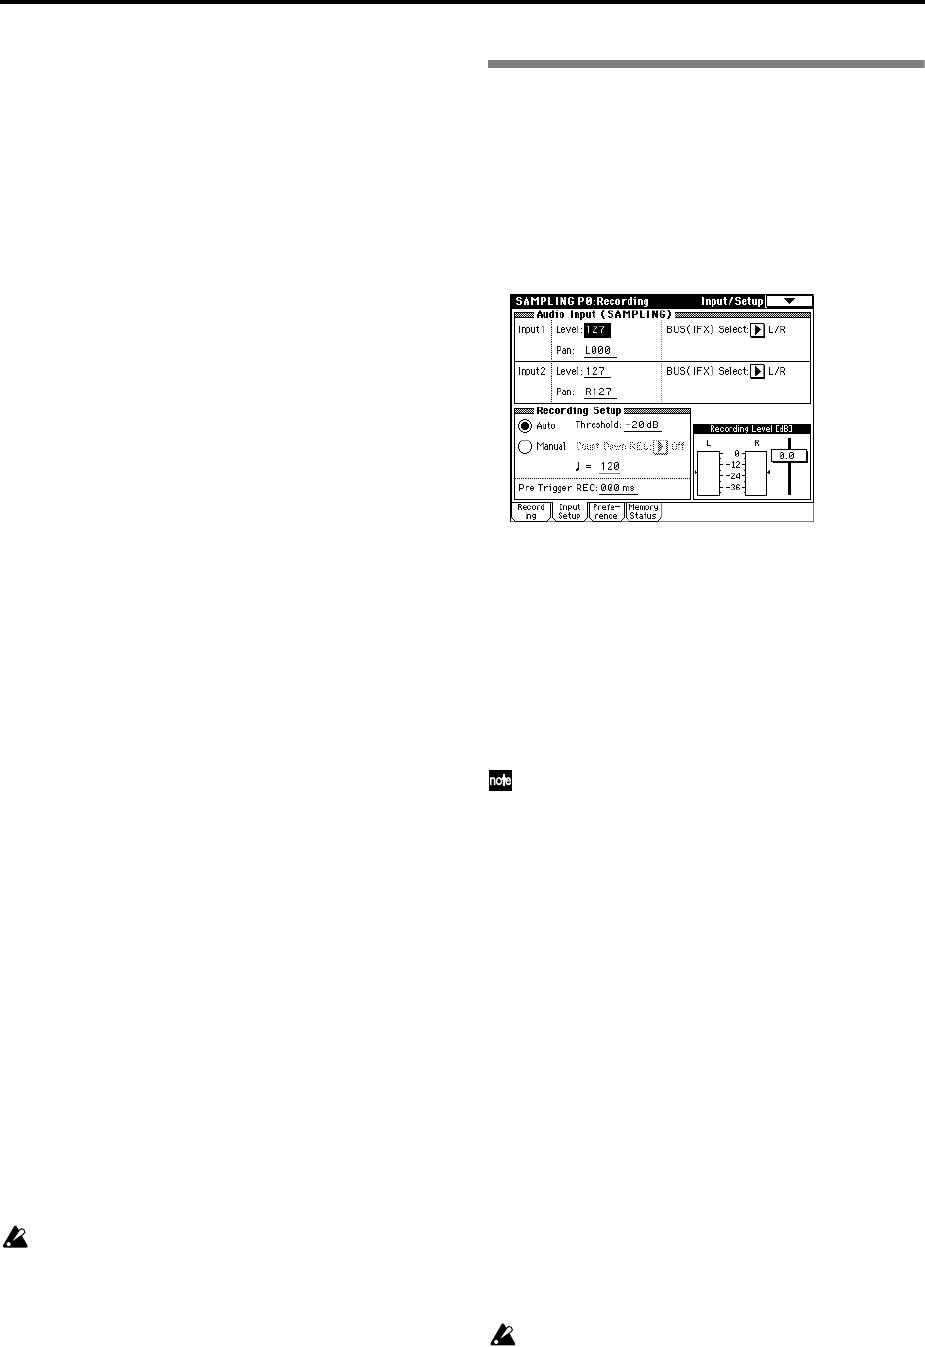
1 In the P0: Recording, select the Input/Setup tab.
2 Use the “Recording Setup” radio buttons to select
Auto.
This will select auto recording mode.
3 Set the “Threshold.”
When the input signal exceeds the “Threshold”
level, sampling will begin automatically. The black
triangles at both sides of the Recording Level [dB]
meter display will indicate the specified level.
When you use auto sampling, the attack portion of
the sampled input sound may be lost, depending
on the “Threshold” setting. If this occurs, you can
use “Pre Trigger REC” to sample the sound that
occurs before sampling actually begins. Normally
you will set this to 0, and use it only when neces-
sary.
4 In P0: Recording, select the Recording tab.
5 Select the “MS” (multisample) (refer to “Manual
sampling” step 4).
6 Select the sample in “Sample Select” that you wish
to record (refer to “Manual sampling” step 5).
7 Specify the “Sample Mode” (refer to “Manual
sampling” step 6).
8 Press the [REC/WRITE] key.
9 Press the [START/STOP] key.
When the input signal exceeds the “Threshold”
level, sampling will begin automatically.
0 Sampling will stop when you press the [START/
STOP] key once again.
Sampling will end automatically if the remaining
amount of memory reaches zero.
A Play the C2 note on the keyboard, and you will
hear the sound that you sampled.


