


99
Basic functions
For this example, set timbres 1–4 to a “Status” of
INT, and timbres 5–8 to a “Status” of Off. Set the
“MIDI Channel” of timbres 1–4 to Gch.
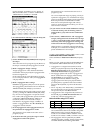
3 In Combination P7: Edit-Arp., select the Setup tab.
4 Set the ARPEGGIATOR [TEMPO] knob to specify
the tempo.
This is the same as for a program (
☞p.96). However,
the tempo is shared by both arpeggiators A and B.
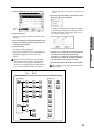
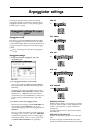
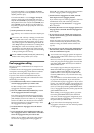
5 Make “Arpeggiator Assign” settings.
Assign arpeggiator A or B to the desired timbres.
Each timbre will be played by the arpeggiator that
has been assigned to it.
In the example shown in the illustration, arpeggia-
tor A is will play timbres 1 and 2, and arpeggiator B
will play timbre 3.
6 Make “Arpeggiator Run” settings.
Check the arpeggiator(s) that you want to operate.
The arpeggiator(s) checked here will run when the
ARPEGGIATOR [ON/OFF] key is turned on.
With the settings shown in the LCD screen for steps
2 and 3, turning the ARPEGGIATOR [ON/OFF]
key on will cause arpeggiator A to operate for tim-
bres 1 and 2, and arpeggiator B to operate for timbre
3. When the ARPEGGIATOR [ON/OFF] key is
turned off, timbres 1–4 will sound as a layer.
If all timbres “Arpeggiator Assign” are Off, or if
neither “Arpeggiator Run” A or B is checked, the
arpeggiator will not function.
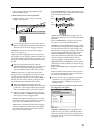
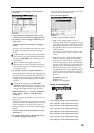
7 In the Arpeggiator A and Arpeggiator B tabs, set
the parameters for arpeggiators A and B.
The parameters for A and B are the same as for a
program (
☞p.96).
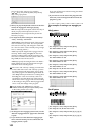
8 In the Scan Zone tab, specify the range in which
arpeggiators A and B will operate.
The parameters for A and B are the same as for a
program (
☞p.97).
You can use keyboard ranges or playing velocity to
operate the arpeggiator, or to switch between arpeg-
giators A and B. By setting the Key Zone tab and Vel
Zone tab parameters of Combination P4: Edit-
Zone/Ctrl to set keyboard ranges and velocity
ranges in conjunction with each other, you can cre-
ate even more variations.
9 If you wish to save the edited combination settings
in internal memory, turn off memory protect in
Global mode (
☞p.37), and write the combination.
(
☞p.38).
0 The “Status,” “MIDI Channel” and “Arpeggiator
Assign” settings shown in the LCD screen of steps
2 and 3 can be made so that certain timbres will
sound only when the arpeggiator is running, and
will be silent when the arpeggiator is not running.
Although this is a somewhat sophisticated editing
technique, we will describe the settings of one of the
preset combinations as an example.
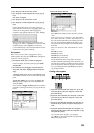
Combination A003: Drum’n’Bass Kit
Select combination A003: Drum’n’Bass Kit, and play
it.
Before you play, make sure that the global MIDI chan-
nel (Global P1: MIDI “MIDI Channel”) is set to 01.
• Arpeggiator A is assigned to T (timbre) 7 and 8.
When you play the keyboard, only the T8 program
B068: Drum’n’Bass Kit will be sounded by the
U158 (A/B): Drum’n’Bass 6 arpeggio pattern.
• The arpeggio pattern will use the “Arpeggio Tone
Mode” (Global P6: User Arpeggio, Pattern Setup
tab) Fixed Note, as appropriate for a drum
arpeggio performance. With this setting, the
arpeggio pattern will always be played with the
specified pitches, regardless of the note numbers
played on the keyboard (
☞p.127 in the Parameter
Guide).
• The A “Top Key” and “Bottom Key” (Combination
P7: Scan Zone tab) are set so that arpeggiator A
will operate only for notes B3 and lower.
• Arpeggiator A is also assigned to T7, but this is so
that the T8 program B068: Drum’n’Bass Kit will
sound only when the arpeggiator is on.
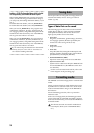
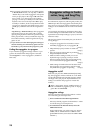
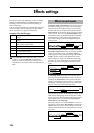
Notice the timbre settings for T7 and T8
• When the arpeggiator is off, playing the keyboard
will sound timbres that are set to Gch or the global
MIDI channel (in this example, 01). T8 will not
sound since its “MIDI Channel” of 02. T7 will not
sound since its “Status” is Off, even if T7 is set Gch.
• The arpeggiator will be operated by any MIDI
channel assigned to a timbre. In this example, these
are MIDI channels 02 and Gch (global MIDI
Status MIDI Channel Arpeggiator Assign
T7 Off Gch A
T8 INT 02 A
Arpeggiator settings