68
Enjoying Music in the Remote Zone—Continued
The section explains how to turn on, select an input
source, and adjust the volume for Zone 2.
Note:
To control Zone 2 with the remote controller, you must
first press its Zone 2 button, and then press the next but-
ton within five seconds (i.e., while the DTR-7.4’s
Standby indicator is flashing).
Notes:
• If the Sleep function has been set, any Zone 2 compo-
nent will turn off along with the DTR-7.4 when the
specified sleep time expires. To use the Sleep function
with Zone 2 only, set the Sleep function and then set
the DTR-7.4 to Standby.
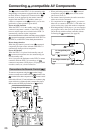
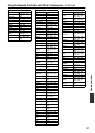
• Only analog input sources are output by the PRE OUT
SURR BACK/ZONE 2 outputs and the SURR BACK/
ZONE 2 SPEAKERS terminals. Digital input sources
are not output. If no sound is heard when an input
source is selected, check if it’s connected to analog
inputs.
• Since the Zone 2 function and the REC OUT outputs
use the same circuitry, if the Rec Out button is pressed,
Zone 2 will be turned off.
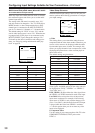
• When the SURR BACK/ZONE 2 outputs (SPEAK-
ERS/PRE OUT) are set to Zone 2 (page 67), listening
modes that need surround back speakers (i.e., Dolby
Digital EX, DTS-ES, and THX Surround EX) are not
available.
• While Zone 2 is active, functions will not work.
• While Zone 2 is active, the Pure Audio listening mode
cannot be selected for the main room.
• You can’t select different radio bands for Zone 2 and
the main room. For example, if you select FM for the
main room, then FM will also be selected for Zone 2.
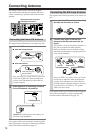
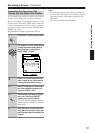
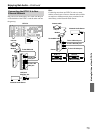
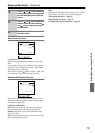
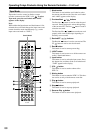
Enjoying Music in the Remote Zone
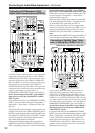
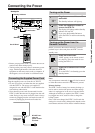
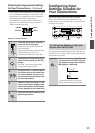
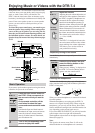
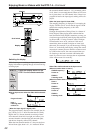
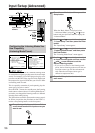
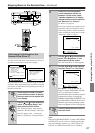
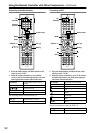
1
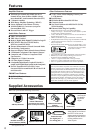
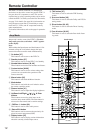
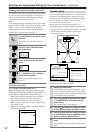
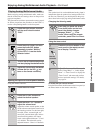
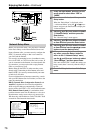
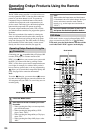
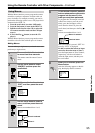
Point the remote controller at the
DTR-7.4 and press the Zone 2
button followed by the On button.
This activates Zone 2 and, if connected
to the DTR-7.4’s 12V TRIGGER OUT,
turns on the Zone 2 amp.
To do this on the DTR-7.4, press
the Zone 2 button.
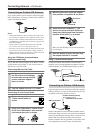
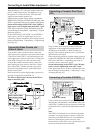
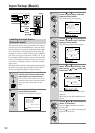
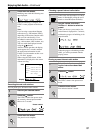
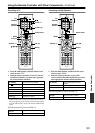
2
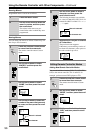
To select the Zone 2 input source
with the remote controller, press
the Zone 2 button and then roll
the scroll wheel.
The name of the selected Zone 2 source
appears on the display.
To do this on the DTR-7.4, press
the Zone 2 button, and then press
an input source button within
eight seconds.
If you select AM or FM, you can use
the remote controller’s CH/Disc +/–
button to select the presets.
To set the main room and Zone 2
sources simultaneously, press the Zone
2 button repeatedly until “Z2 Sel:
SOURCE” appears on the display.
Now use the scroll wheel or input
source buttons to select the source.
Master Volume
Tape
Tuner Phono Net AudioCD
Video 1
VCR 1
Video 3
Video 2
VCR 2
Video 4 Video 5
DVD
)
)
A
-
FO
RM Listening Mode Memory
Video 5 Input
StereoDirect
/
Pure Audio
DSP
Surround THX
Clear
Rec Out
Zone 2 Of
f
Setup
Tuning
Preset
Enter
Return
DimmerDisplay
S Video
Audio
Video L R
Memory FM Mode
DTR
-
7.4
Digital
--
/
---
@.
-
'
/ ABC DEF
PQRS TUV WXYZ
GHI JKL MNO
TV CH
TV VOL
RC
-
550
M
+
10 0
123
456
789
THX
DSP DSP
+
-
+
-
Direct Tuning
Caps Delete
Language Loca
t
ion
Album Ar
tist GenrePlaylist
Custom
Display
Dimmer
T
V
Input
Sleep
Muting
AngleSubtitleAudio
MemorySearchA
-
BRepeat
T
V
On Standby
A
u
d
i
o
A
D
J
E
x
i
t
G
u
i
d
e
Random
Step
/
Slow
Rec
Last Memory
Clear
Input
T
o
p
M
e
n
u
M
e
n
u
S
e
t
u
p
R
e
t
u
r
n
Zone
2
InputMode
Macro
CH
VOL
Disc
Test Tone
CH SEL
Pure A
Surround
Direct
Stereo
Re
-
EQ
All CH ST
Level
+
Level
-
L Night
Audio SEL
Enter
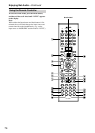
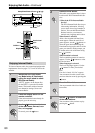
Zone 2
Level –/+
Standby
Zone 2
On
Input source
buttons
Scroll wheel
Zone
2
On
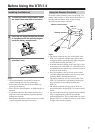
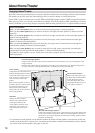
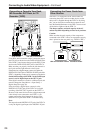
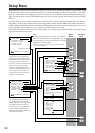
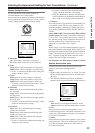
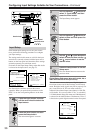
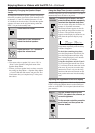
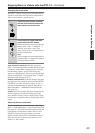
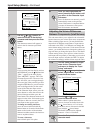
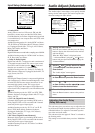
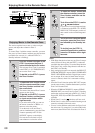
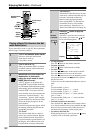
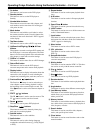
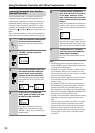
3
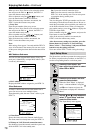
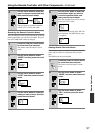
To adjust the Zone 2 volume with
the remote controller, press the
Zone 2 button, and then use the
Level –/+ buttons.
To do this on the DTR-7.4, use the
or
cursor buttons.
If your Zone 2 receiver/integrated amp
is connected to the DTR-7.4’s AUDIO
ZONE 2 OUT L/R outputs, use the vol-
ume control on the receiver/integrated
amp.
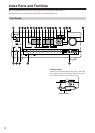
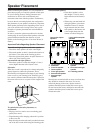
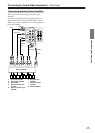
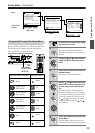
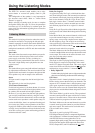
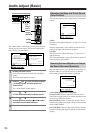
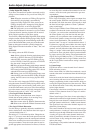
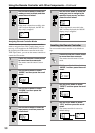
4
To turn off Zone 2 with the remote
controller, press the Zone 2 but-
ton followed by the Standby but-
ton.
To do this from the DTR-7.4,
press the Zone 2 button, and then
press the Off button within eight
seconds.
Zone
2
Level
+
Level
-
Zone
2
Standby