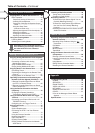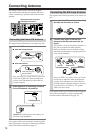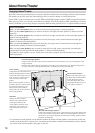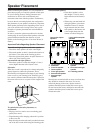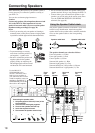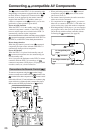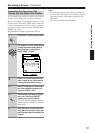
36
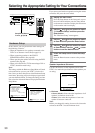
Configuring Input Settings Suitable for Your Connections—Continued
If the default input settings do not suit your connec-
tions, perform the following procedures to configure
your input settings.
The settings made in this menu are valid for the input
source that is currently selected with the input source
buttons on the front panel and, therefore, these settings
are made separately for each input source.
For details on the Input Setup settings when Net Audio
is selected as the input source, see page 78.
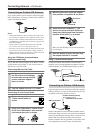
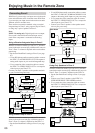
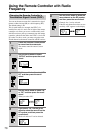
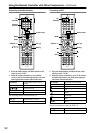
The illustrations used here represent the remote
controller. When you perform the procedures on the
DTR-7.4, use the corresponding buttons on the front
panel.
Digital Setup Sub-menu
(When NET AUDIO, FM, or
AM is NOT selected as the input source)
This sub-menu concerns the input of digital signals
from input sources and if these settings are incorrectly
made, the digital audio signals may not be properly out-
put, or not heard at all. This sub-menu cannot be
selected if the selected input source button is AM, FM,
or Net Audio. It is not accessible if “Yes” is selected in
2-2. Multichannel Setup Sub-menu and “Multichannel”
is selected in the Audio Selector. Furthermore, Video 5
is fixed to the optical digital terminal on the front panel.
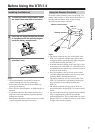
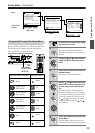
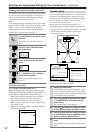
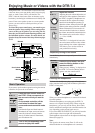
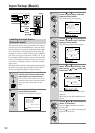
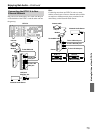
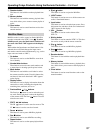
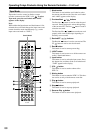
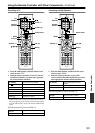
Input Setup
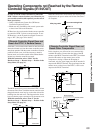
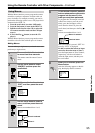
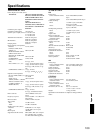
1
Press the Input button, and then
roll the scroll wheel to select the
input source.
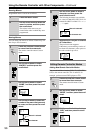
2
Press the scroll wheel, and then
press the Setup button.
The main menu appears onscreen.
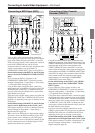
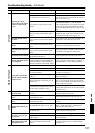
Master Volume
Standby/On
UpsamplingPure Audio
Audio
Selector
Tape
Tuner Phono Net AudioCD
Video 1
VCR 1
Video 3
Video 2
VCR 2
Video 4 Video 5
DVD
Zone 2
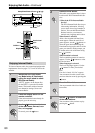
()
GRN
Rec
()
RED
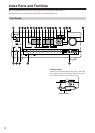
A
-
FO
RM Listening Mode Memory
Video 5 Input
StereoDirect
/
Pure Audio
DSP
Surround THX
Clear
Rec Out
Zone 2 Of
f
Setup
Tuning
Preset
Enter
Return
DimmerDisplay
S Video
Audio
Video L R
Phones
Standby
Memory FM Mode
DTR
-
7.4
Digital
--
/
---
@.
-
'
/ ABC DEF
PQRS TUV WXYZ
GHI JKL MNO
TV CH
TV VOL
+
10 0
123
456
789
+
-
+
-
Direct Tuning
Custom
Dimmer
T
V
Input
Sleep
T
V
On Standby
A
u
d
i
o
A
D
J
E
x
i
t
G
u
i
d
e
Clear
Input
T
o
p
M
e
n
u
M
e
n
u
S
e
t
u
p
R
e
t
u
r
n
Zone
2
InputMode
Macro
CH
VOL
Disc
Enter
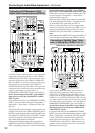
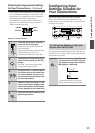
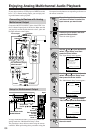
Input
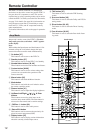
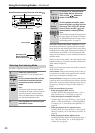
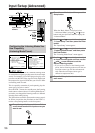
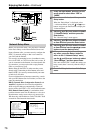
Input source buttons
Setup/Enter/
Return/Cursor
/ //
Scroll wheel
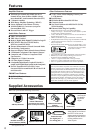
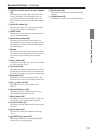
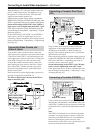
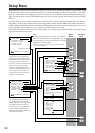
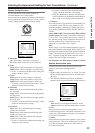
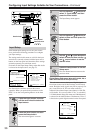
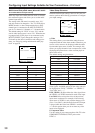
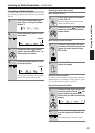
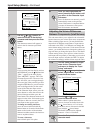
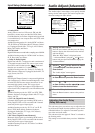
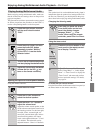
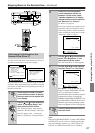
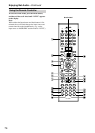
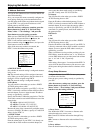
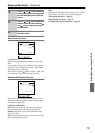
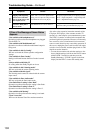
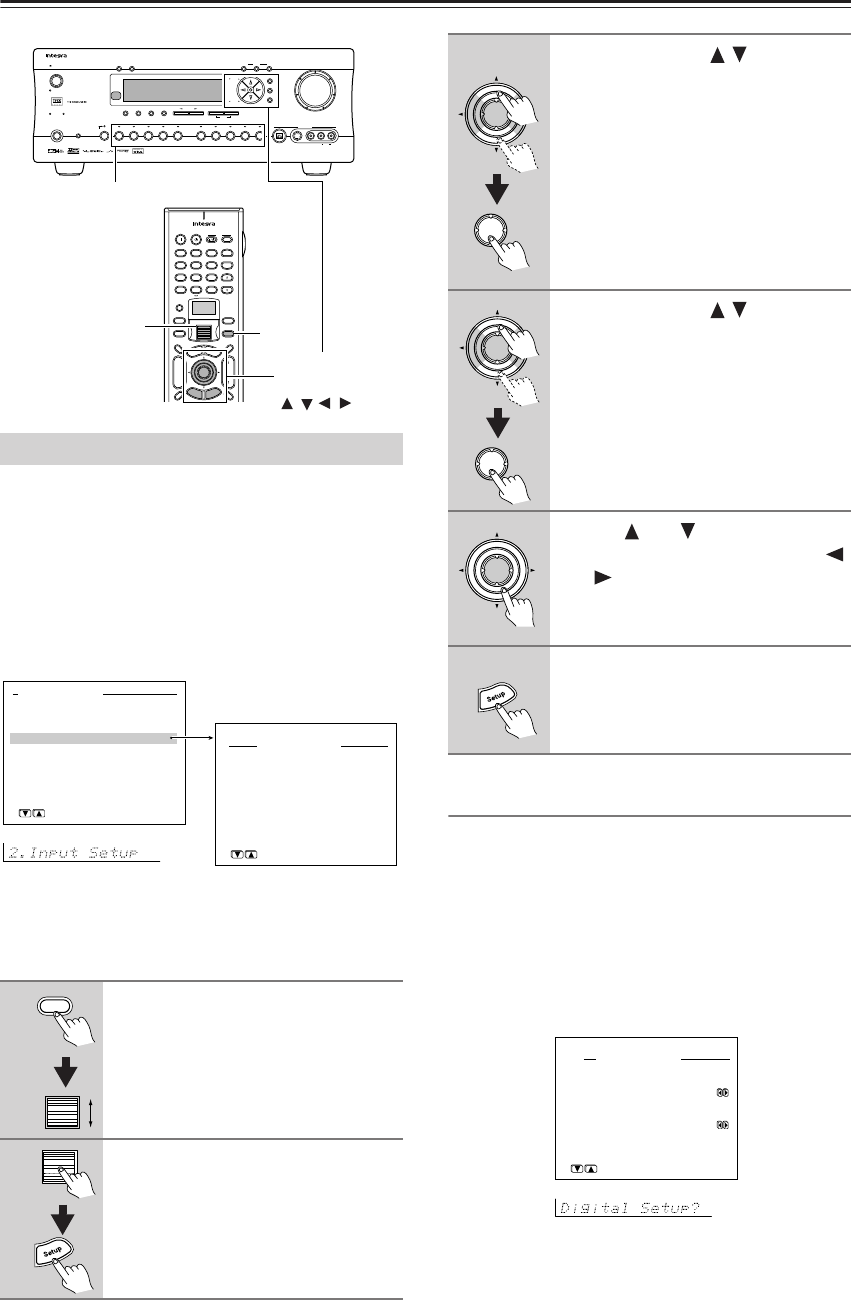
Basic Menu
0.Hardware Setup
1.Speaker Setup
2.Input Setup
3.Audio Adjust
→
Advanced Menu
[ENTER]Quit:[SETUP]
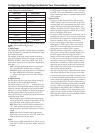
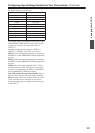
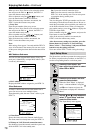
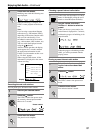
2.Input Setup
1.Digital Setup
2.Multichannel Setup
3.Video Setup
4.Character Input
5.IntelliVolume
[ENTER]Quit:[SETUP]
Input:DVD
Input
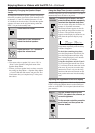
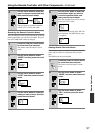
3
Use the Up/Down / buttons to
select “2. Input Setup,” and then
press the Enter button.
The Input Setup menu appears.
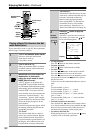
4
Use the Up/Down / buttons to
select an item and then press the
Enter button.
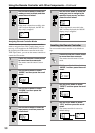
5
Use the and cursor buttons to
select an item and then use the
and cursor buttons to set the
desired value.
6
Press the Setup button to exit the
Setup menu.
Press the Return button to return to the
previous menu.
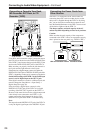
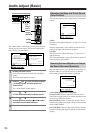
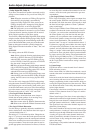
2-1.Digital Setup
a.Digital Input
:COAX1
b.Digital Format
:All
Quit:[SETUP]
Input:DVD