


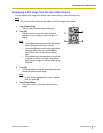
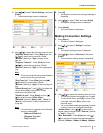
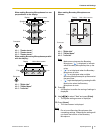


3. Use [ ][ ] to select "Sound
Settings" and press
[Enter].
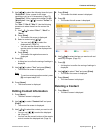
• The sound settings screen is displayed.
4. Use [ ][ ] to select the following items for input:
"Welcome Screen Vol."
: Press [Enter] and use
[
][ ] to select the volume level ("Low",
"Medium" [default] or "High") played at the
start-up.
"Ringback Tone Vol."
: Press [Enter] and use
[
][ ] to select the volume level ("Low",
"Medium" [default] or "High") of an outgoing call
ring.
Note
• The
volume
level of the busy tone will be the
same level as the ring back tone.
"Ring Tone Vol.": Press [Enter] and use [
]
[ ] to select the volume level ("Low",
"Medium" [default] or "High") of an incoming call
ring.
"Default Sound Lev.": Use [ ][ ] to select the
volume level (0–20) at the start of a video
conference call (default: 16).
"Sound Pre-sets": Press [Enter] and use [
]
[ ] to select the tone ("More Highs",
"Standard" [default], "More Lows", "Voice" or
"Music") at the start of a video conference call.
(Page 48)
Note
• You can listen to a sample of the following
items by pressing [R].
– "Welcome Screen Vol."
– "Ringback Tone Vol."
– "Ring Tone Vol.
"
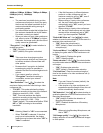
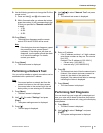
5. Press [G].
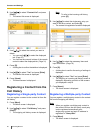
• A dialog box to confirm the saving of settings is
displayed.
6. Use [ ][ ] to select "Yes" and press [Enter].
• The system settings screen is displayed.
7. Press [Home].
• The Home screen is displayed.
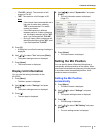
Making Connection Settings
1. Press [Menu].
• The Menu screen is displayed.
2. Use [
][ ] to select "Settings" and press
[Enter].
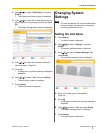
• The system settings screen is displayed.
3. Use [
][ ] to select "Call set up" and press
[Enter].
• The connection settings screen is displayed.
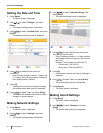
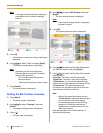
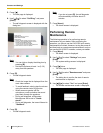
4. Use [ ][ ] to select the following items for input:
• The
following items are displayed over 2 pages.
To view all the items, press [R] to move to the
next page, and press [B] to move to the
previous page.
• You must save the settings separately for each
screen on which you changed the settings.
"Answer Mode": Use [
][ ] to select how to
answer video conference calls ("Manual" [default]
or "Auto"). (Page 37)
"Max. Bandwidth": Press [Enter] and use [ ]
[ ] to select the maximum allowed bandwidth to
be used (1.0Mbps, 1.2Mbps, 2.0Mbps, 3.0Mbps,
Document Version 2010-10 Operating Manual 63
Contacts and Settings